Installing and Deploying QATrack+ on Windows Server
Note
This guide assumes you have at least a basic level of familiarity with Windows Server, SQL Server Management Studio, and the command line.
New Installation
This guide is going to walk you through installing QATrack+ on a Windows Server 2016-2019 server with IIS serving static assets (images, javascript and stylesheets) and acting as a reverse proxy for a CherryPy web server which serves our Django application (QATrack+). The instructions have been tested with SQL Server 2016 & 2019 database
If you are upgrading an existing QATrack+ installation, please see one of the following pages:
Note
This guide assumes you have SQL Server Management Studio (SSMS) and Internet Information Services (IIS) installed/enabled
The steps we will be undertaking are:
Install Google Chrome
If you want to be able to generate or schedule PDF reports, you need to have Google Chrome installed. Download and install Chrome here: https://www.google.com/chrome/index.html
Installing Python 3
Go to http://www.python.org/downloads/ and download the latest Python 3.9.X (3.9.1 at the time of writing) 64 bit version (e.g. the “Windows installer (64-bit)” link). Run the installer and on the first page, make sure both “Install launcher for all users” and “Add Python 3.9 to PATH” are checked and then click the “Customize Installation” button.
On the second page of the installer, leave the defaults and click “Next”.
On the third page, make sure you have “Install for all users” selected (this is important!) before clicking “Install”.
Installing git and checking out the QATrack+ Source Code
Go to http://git-scm.com and download the latest version of git (msysgit) for Windows (Git-2.30.0 at the time of writing). Run the installer. I just leave all the settings on the defaults but you are free to modify them if you like.
Checkout the latest release of QATrack+ source code from GitHub
Open a Windows PowerShell terminal and then create a directory for QATrack+ and check out the source code, use the following commands:
mkdir C:\deploy
cd C:\deploy
git clone https://github.com/qatrackplus/qatrackplus.git
Setting up our Python environment
Ensure you have python3 installed correctly and on your PATH by running:
python --version
# should print e.g. Python 3.9.1 or similar
We’re now ready to install all the libraries QATrack+ depends on.
mkdir venvs
python -m pip install --upgrade pip
python -m venv venvs\qatrack31
.\venvs\qatrack31\Scripts\Activate.ps1
python -m pip install --upgrade pip
cd qatrackplus
git checkout v3.1.1.4
pip install -r requirements\win.txt
Warning
If you are going to be using Active Directory for authenticating your users, you need to install pyldap. There are binaries available on this page: https://www.lfd.uci.edu/~gohlke/pythonlibs/#python-ldap. Download the binary relavant to your distribution (e.g. python_ldap‑3.3.1‑cp39‑cp39‑win_amd64.whl) and then pip install it:
pip install C:\path\to\python_ldap‑3.3.1‑cp39‑cp39‑win_amd64.whl
Creating a database with SQL Server
Ensure ODBC Driver 17 (or 13.1) is installed
In order for QATrack+ to connect to your database, you need to have the ODBC Driver 17 installed. Visit https://www.microsoft.com/en-us/download/details.aspx?id=56567 and download and install the driver (64 bit).
Ensure SQL Server Authentication is enabled
Open SQL Server Management Studio and connect to ‘localhost’ or another database server.
In the Object Explorer frame right click on the server you are connected to and click Properties. In the dialog that opens click on Security, ensure SQL Server and Windows Authentication mode is selected and then click OK. Now right click on your server again and click Restart.
Create a new database
In the Object Explorer frame, right click the Databases folder and select “New Database…”.
Enter ‘qatrackplus31’ as the database name and click OK.
Back in the Object Explorer frame, right click on the main Server Security folder and click New Login… Set the login name to ‘qatrack’, select SQL Server Authentication. Enter ‘qatrackpass’ (or whatever you like) for the password fields and uncheck Enforce Password Policy. Click OK.
Again in the Object Explorer frame, right click on the main Security folder and click New Login… Set the login name to ‘qatrack_reports’, select SQL Server Authentication. Enter ‘qatrackpass’ (or whatever you like) for the password fields and uncheck Enforce Password Policy. Click OK.
Back in the Object Explorer frame, expand the qatrackplus31 database, right click on Security and select New->User.
Enter ‘qatrack’ as the User name and Login name and then in the Database Role Membership region select ‘db_ddladmin’, ‘db_datawriter’, ‘db_datareader’ and ‘db_owner’. Click OK.
Now add the readonly database user for the query tool. In the Object Explorer frame, expand the qatrackplus31 database, right click on Security and select New->User.
Enter ‘qatrack_reports’ as the User name and Login name and then in the Database Role Membership region select ‘db_datareader’. Click OK.
Configuring QATrack+ to use your new database
Copy the example local_settings file:
cp deploy\win\local_settings.py qatrack\local_settings.py
and then edit it so that the NAME, USER, and PASSWORD settings match the way you set up your database above.
DEBUG = False

DATABASES = {
    'default': {
        'ENGINE': 'sql_server.pyodbc',
        'NAME': 'qatrackplus31',
        'USER': 'qatrack',  # USER/PWD can usually be left blank if SQL server is running on the same server as QATrack+
        'PASSWORD': 'qatrackpass',
        'HOST': '', # leave blank unless using remote server or SQLExpress (use 127.0.0.1\\SQLExpress or COMPUTERNAME\\SQLExpress)
        'PORT': '', # Set to empty string for default. Not used with sqlite3.
        'OPTIONS': {
            'driver': 'ODBC Driver 17 for SQL Server'
        },
    },
    'readonly': {
        'ENGINE': 'sql_server.pyodbc',
        'NAME': 'qatrackplus31',
        'USER': 'qatrack_reports',
        'PASSWORD': 'qatrackpass',
        'HOST': '',
        'PORT': '',
        'OPTIONS': {
            'driver': 'ODBC Driver 17 for SQL Server'
        },
    }
}

ALLOWED_HOSTS = ['127.0.0.1', 'localhost']  # See local settings docs
Confirm you can connect to your database by running the showmigrations command:
python manage.py showmigrations accounts
which should show output like:
accounts
    [ ] 0001_initial
    [ ] 0002_activedirectorygroupmap_defaultgroup
    [ ] 0003_auto_20210207_1027
We will now create the database tables and load some configuration data into our new database from the command prompt:
python manage.py migrate
python manage.py createsuperuser
python manage.py createcachetable
python manage.py collectstatic
Get-ChildItem .\fixtures\defaults\*\*json | foreach {python manage.py loaddata $_.FullName}
Configuring CherryPy to Serve QATrack+
In order to have QATack+ start when you reboot your server, or restart after a crash, we will run QATrack+ with a CherryPy server installed as a Windows service (running on port 8080, see note below if you need to change the port).
Open a new PowerShell window with Administrator privileges (right click on PowerShell and click “Run as Administrator”) and run the following commands:
cd C:\deploy
.\venvs\qatrack31\Scripts\Activate.ps1
cd qatrackplus
cp deploy\win\QATrack31CherryPyService.py .
python C:\deploy\venvs\qatrack31\Scripts\pywin32_postinstall.py -install
python QATrack31CherryPyService.py --startup=auto install
python QATrack31CherryPyService.py start
Open the Windows Services dialog and confirm the QATrack 31 CherryPy Service is installed and has a status of Running. Next open a browser on the server and navigate to http://localhost:8080/ and ensure you see a plain login form there (it won’t look like this once we’re finished!). If not, check the logscherry_py_err.log file for any errors.
Your QATrack+ installation is now installed as a Windows Service running on port 8080 (see note below). You may also wish to configure the service to email you in the event of a crash (see the Recovery tab of the QATrackCherryPyService configuration dialogue).
Note
If you need to run QATrack+ on a different port, edit C:\deploy\qatrackplus\QATrack3CherryPyService.py and set the PORT variable to a different port (e.g. 8008)
Setting up IIS
To start open up the Internet Information Services (IIS) application. We are going to use IIS for two purposes: first, it is going to serve all of our static media (css, js and images) and second it is going to act as a reverse proxy to forward the QATrack+ specific requests to CherryPy.
Before starting please make sure you have both URL Rewrite 2.1 and Application Request Routing 3.0 IIS modules installed. These can be installed by clicking on the “Get New Web Platform Components” link in the right hand side bar of IIS (you may need to install the Web Platform Installer first).
After installing these modules, you will need to close & re-open IIS.
Enabling Proxy in Application Request Routing
Application Request Routing needs to have the proxy setting enabled. To do this, click on the top level server in the left side panel, and then double click the Application Request Routing icon. In the Actions panel click the Server Proxy Settings and then check Enable proxy at the top. Leave all the other settings the same and click Apply and then Back to ARR Cache.
Enabling Static Content Serving in IIS
IIS is not always set up to serve static content. To enable this, open the Server Manager software, click Manage, then Add Roles and Features then Next, Next. In the Roles widget, select Web Server(IIS)->Web Server->Common HTTP Features and make sure Static Content is selected. If it isn’t, enable that role.
Setting up the site and URL rewrite rules
Once you have Applicationn Request Routing installed and proxies enabled, in the left panel of IIS under Sites, select the default Web Site and click Stop on the right hand side.
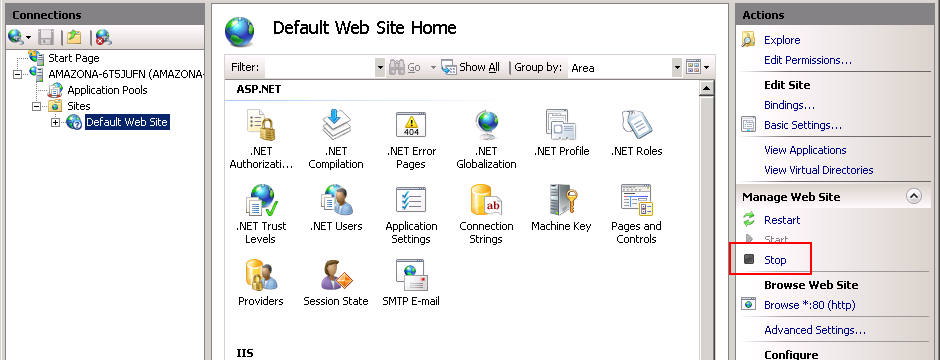
Stop default website
Now right click on Sites and click Add Web Site
Add a new web site
Enter QATrack Static for the Site Name and “C:\deploy\qatrackplus\qatrack\” for the Physical Path then click OK and answer Yes to the warning.
To test that setup worked correctly open a browser on your server and enter the address http://localhost/static/qa/img/tux.png You should see a picture of the Linux penguin.
Next, select the top level server in the Connections pane and then double click URL Rewrite:
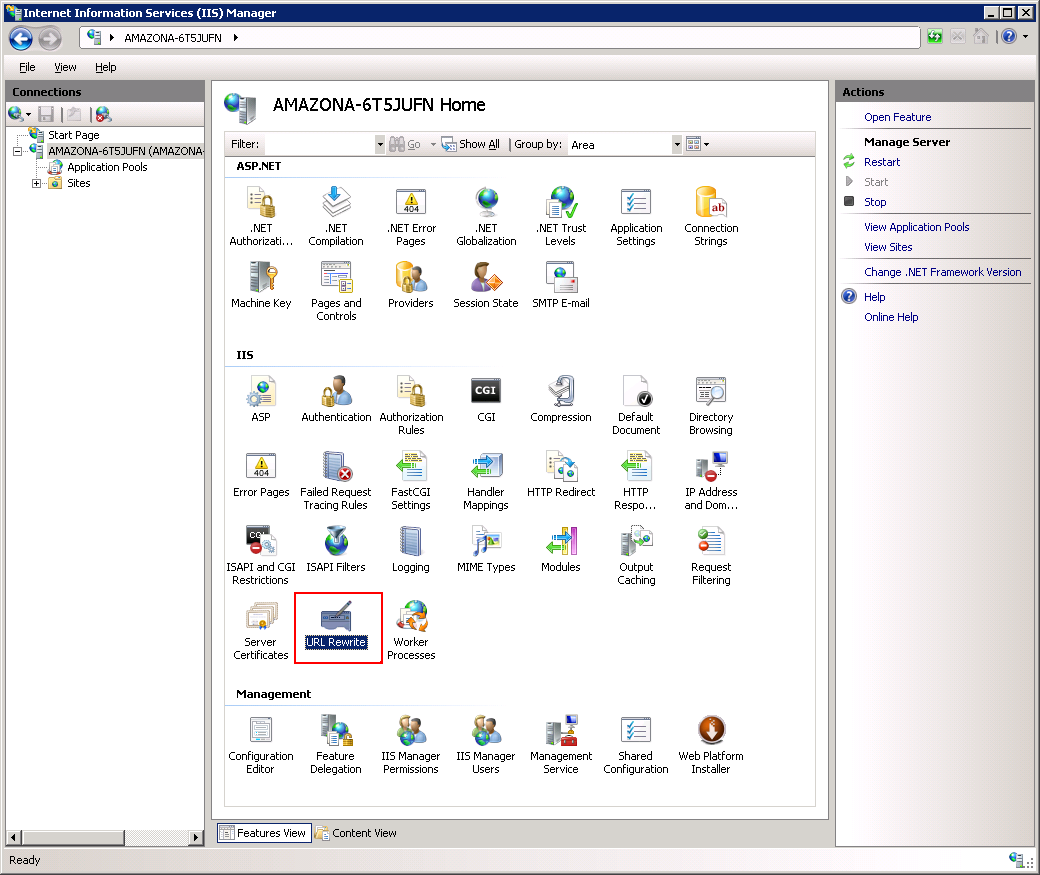
URL Rewrite
In the top right click Add Rule and select Blank Rule.
Give it a name of QATrack Static and enter ^(static|media)/.* for the Pattern field, and select None for the Action type. Make sure Stop processing of subsequent rules is checked.
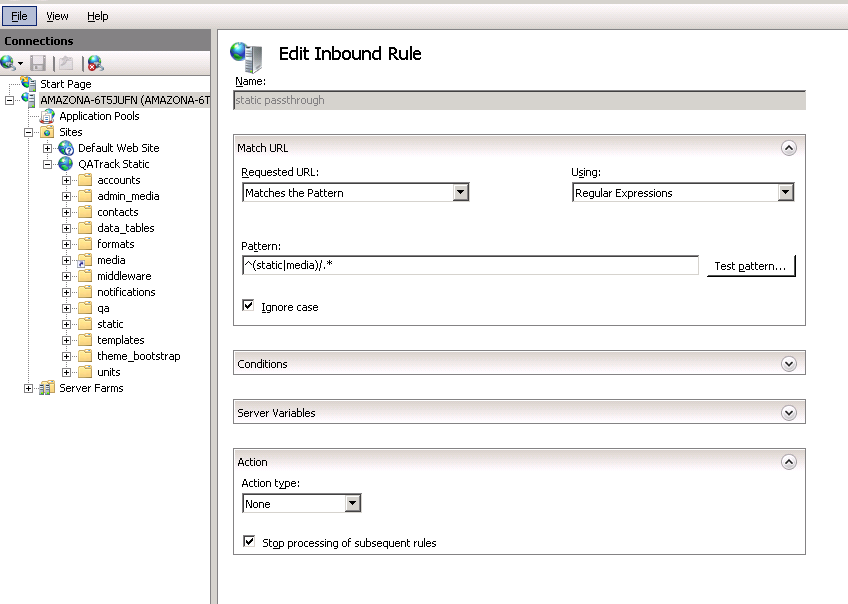
Static URL Rewrite Rule
When finished click Apply, then Back To Rules and then add another blank rule. Give it a name of QATrack Reverse Proxy, enter ^(.*) for the Pattern and http://localhost:8080/{R:1} for the Rewrite URL. In the Server Variables section add a new Server Variable with the Name=HTTP_X_FORWARDED_HOST and the Value=yourservername.com (replace yourservername with whatever your domain is!). Finally, make sure both Append query string and Stop processing of subsequent rules are checked.
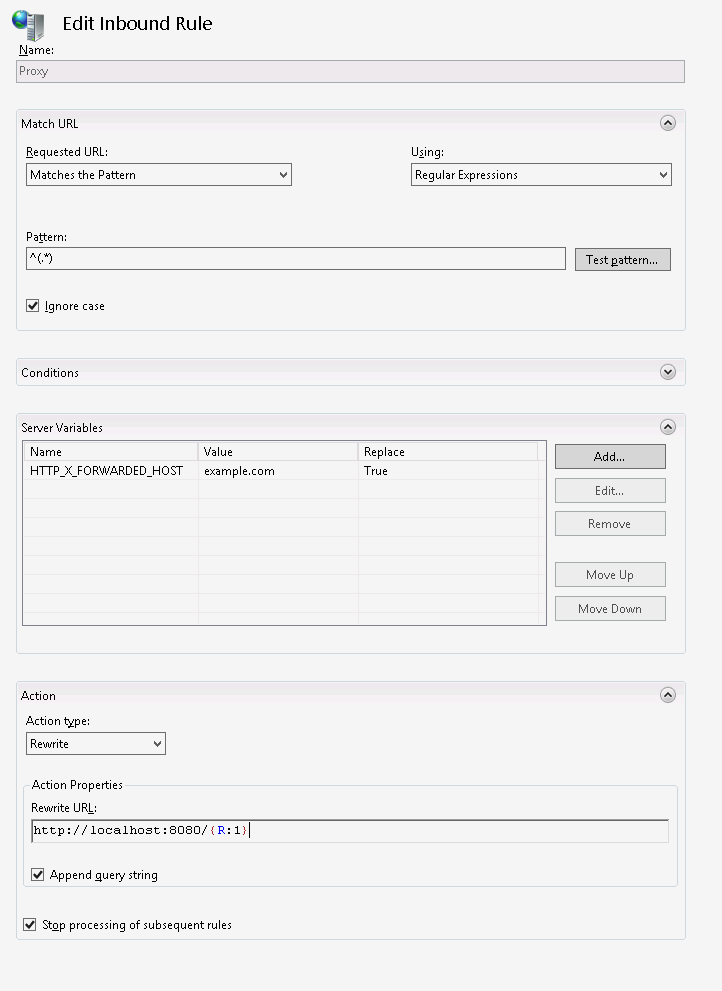
URL Rewrite Reverse Proxy
Your URL rewrites should look like the following (order is important!)

URL Rewrite rules
You should now be able to visit http://localhost/ in a browser on your server and see the QATrack+ login page. Congratulations, you now have a functional QATrack+ setup on your Windows Server!
If you see a “403.14 Forbidden” error, double check you added the URL rewrite rules to the top level server, and not the QATrack Static site.
If you see a “502.3 Bad Gateway” error, double check that your QATrack CherryPy service was installed correctly and is running.
Note
There are many different ways to configure IIS. The method I’ve used above is simple and works well when QATrack+ is the only web service running on a server.
Setting up Django Q
As of version 3.1.0, some features in QATrack+ rely on a separate long running process which looks after periodic and background tasks like sending out scheduled notices and reports. We are going to use Windows Task Scheduler to run the Django Q task processing cluster.
Open the Windows Task Scheduler application and click Create Task. Give the task a name of “QATrack+ Django Q Cluster”. Click the Change User or Group… button and in the Enter the object name to select box put SYSTEM, then click Check Names and OK.
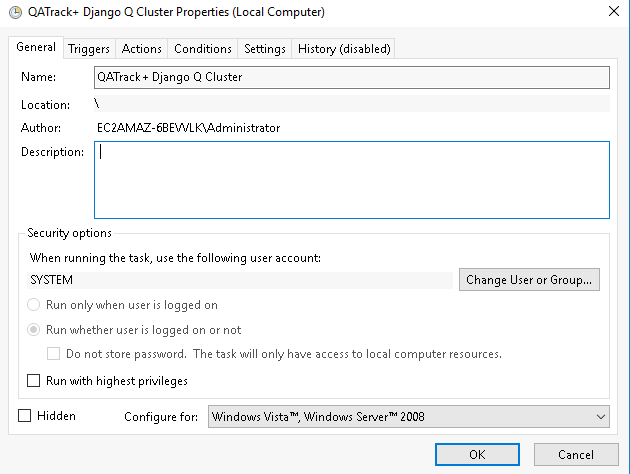
QCluster Task
On the Triggers tab, click New… and in the Begin the task: dropdown select At startup and then click OK.
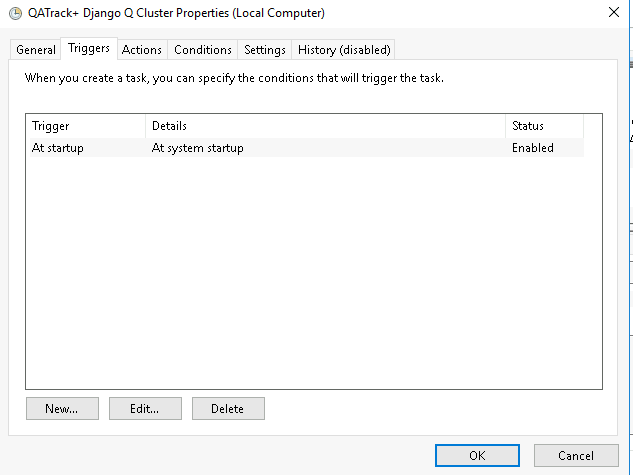
QCluster Trigger
Now go to the Actions tab and click New…. In the Program/script: box enter C:\deploy\venvs\qatrack31\Scripts\python.exe. In the Add arguments (optional): field enter manage.py qcluster, and in the Start in (optional): field put C:\deploy\qatrackplus (no trailing slash!).
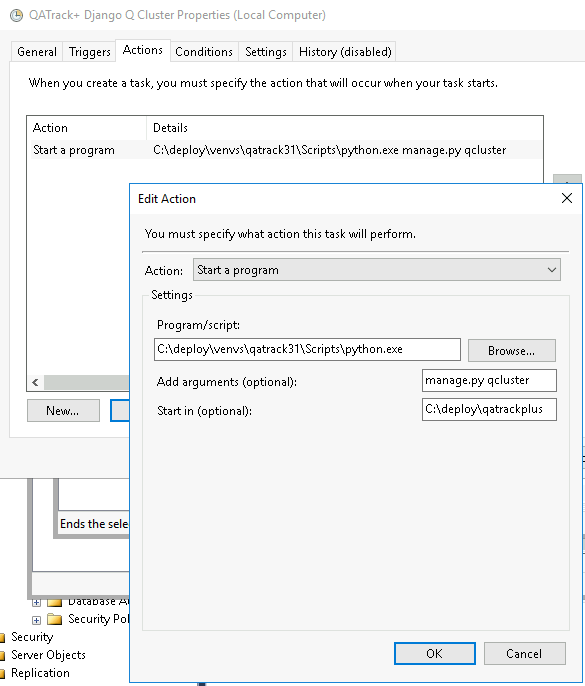
QCluster Action
Click OK, then right click on the task and select Run. Go back to your PowerShell window (or open a new one) and confirm your task cluster is running with python manage.py qmonitor which should show something like:
 Host            Id      State    Pool    TQ       RQ       RC    Up

YOUR-SERVER    e0474f3f  Idle     2       0        0        0     0:05:53

     ORM default     Queued    0    Success   48   Failures       0

                     [Press q to quit]
If the line between Host and ORM default is blank then there is a problem with the Windows Task you created.
What Next
Check the the settings page for any available customizations you want to add to your QATrack+ installation (don’t forget to restart both your QATrack CherryPy Service, and Django Q cluster via the task scheduler after changing any settings!)
Automate the backup of your QATrack+ installation.
Read the Administration Guide, User Guide, and Tutorials.
Wrap Up
This guide shows only one of many possible method of deploying QATrack+ on Windows. It is very similar to what is used at The Ottawa Hospital Cancer Centre and it has proven to be a very solid setup. If you’re stuck with a Windows stack it will likely work for you too. Please post on the QATrack+ Google Group if you get stuck!