Setting up, performing, and reviewing your first test list step-by-step
This guide will take you through:
Logging in and accessing the admin interface
Changing the name displayed at the top of your QATrack+ website
Creating a new Unit
Creating different user groups
Configuring test statuses
Setting up a test list for performing a linac output measurement,
Setting references and tolerances for your tests.
Setting references and tolerances for your tests.
This tutorial assumes your website administrator has QATrack+ configured and running on a server somewhere and has assigned you a username/password with superuser status.
Logging in and accessing the admin interface
Access the url for QATrack+ (your website adminstrator should have provided you with a URL) in your favourite web browser. QATrack+ looks and works best with Chrome or Firefox but Internet Explorer versions 11 and up are also supported.
If you are not already logged in, you will be taken to the login page:
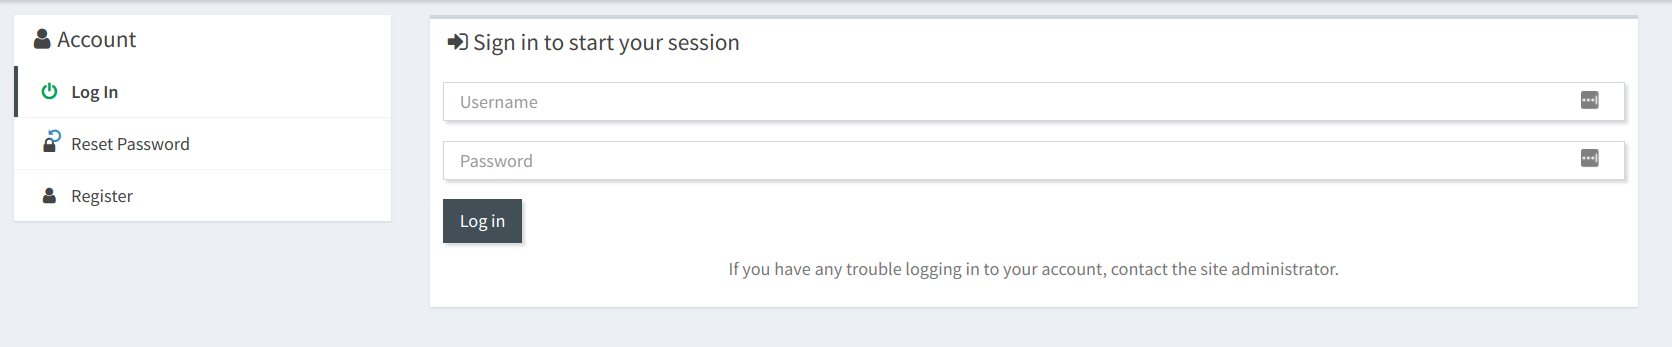
The QATrack+ login screen
enter your username and password and click the Log In button.
After logging in, you should see a screen similar to the one below:
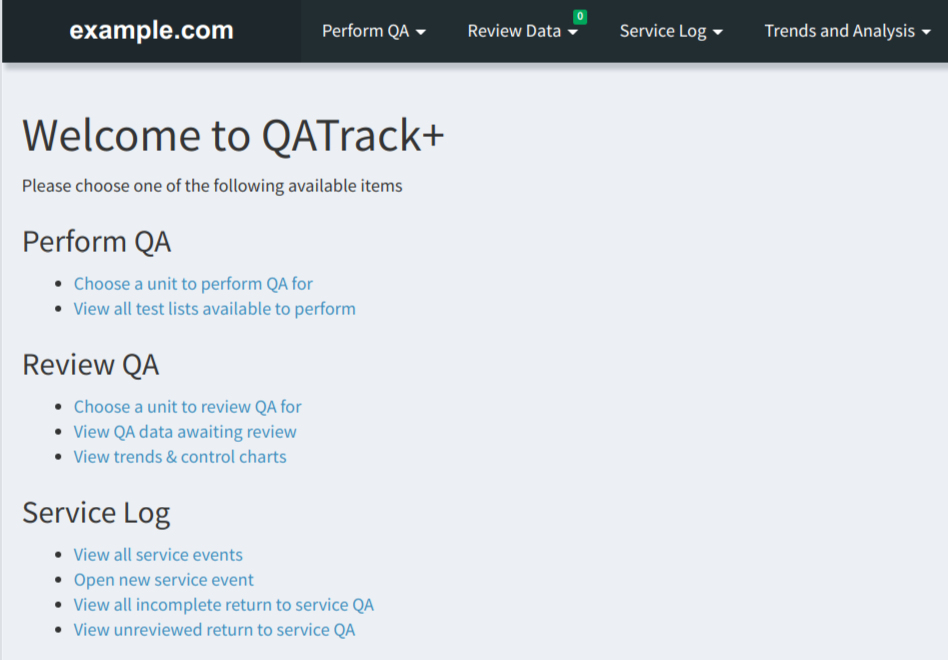
QATrack+ home screen
Click the little dropdown arrow next to your name in the top right hand corner, and then select the Admin option from the dropdown menu.
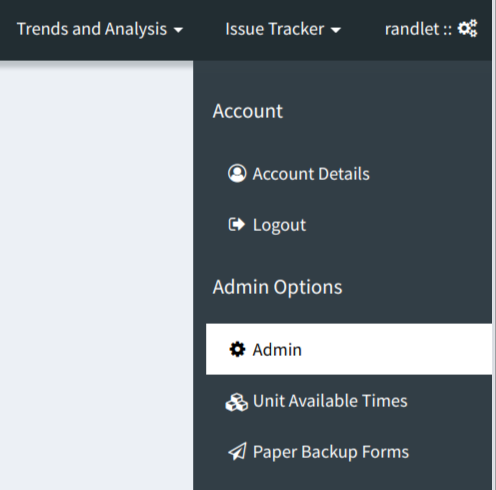
Accessing the QATrack+ admin section
This wll take you to the main admin page where you will be doing all of your QATrack+ configuration.
Setting up the name of your QATrack+ website
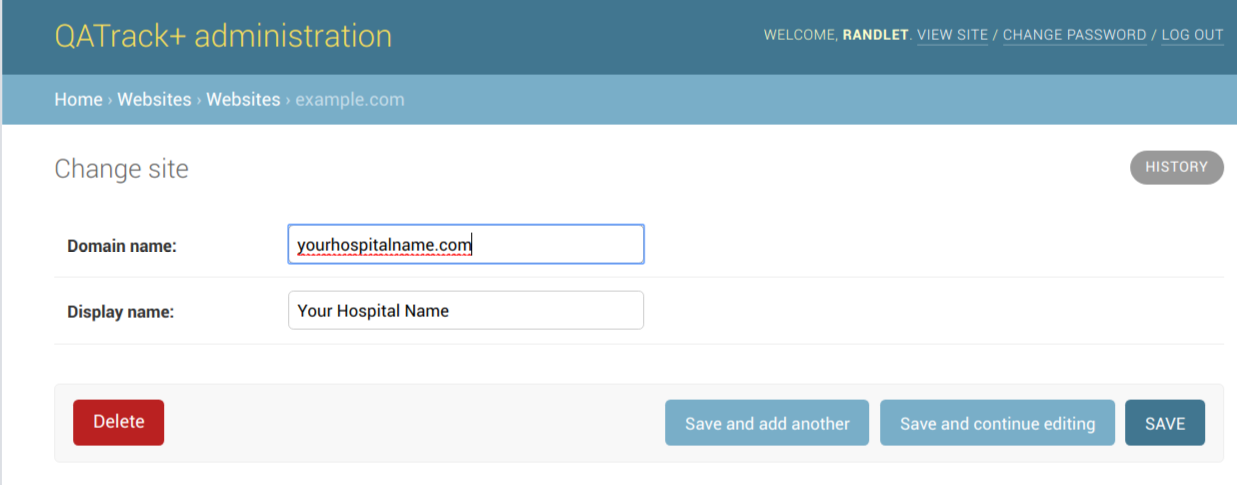
As you may have noticed in earlier screen shots, the words “example.com” are displayed at the top of your website. Let’s change that to “Your Hospital Name”.
From the main admin page find the Websites section and click on the Websites link.

Sites section of the admin
Click on the example.com entry under the Domain name column header.
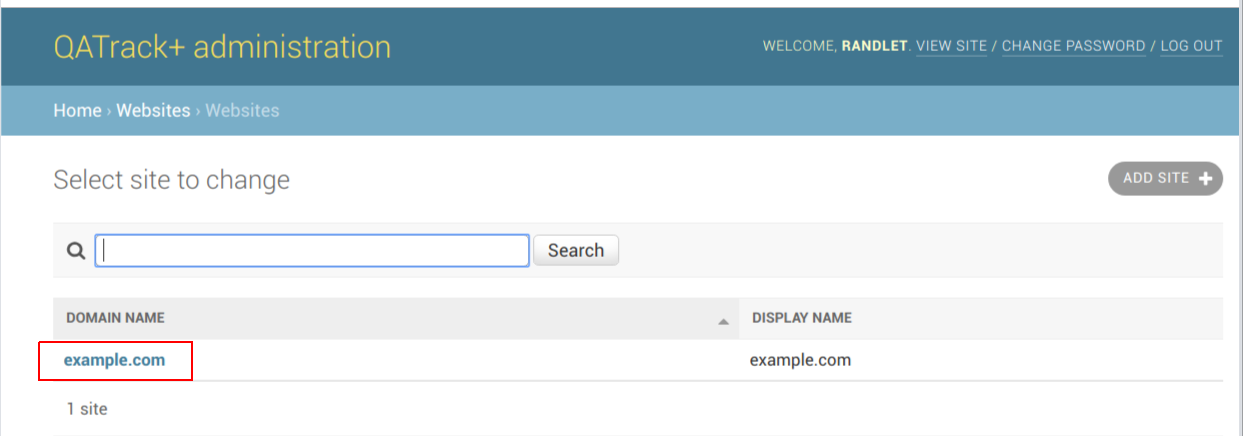
The example.com site object
and then set the relevant fields (ask your admin if you’re not sure of the domain name to use) and click Save when you’re finished.
Setting the website name
If you now return to the main site (at any time you can click the QATrack+ administration header at the top of the admin pages to return to the main QATrack+ site) you should see your site now says Your Hospital Name+ at the top rather than example.com.
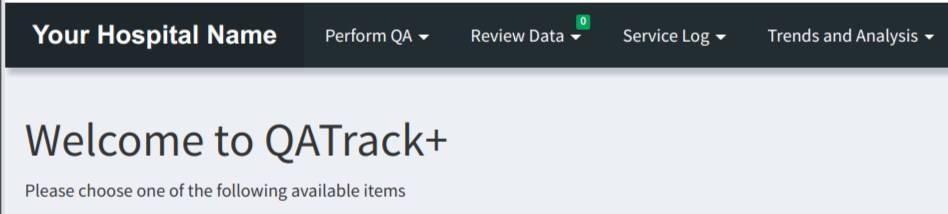
Changed site name
In the next step of this tutorial we will configure a new Unit.
Creating a new Unit
In order to prevent duplicating information here, please follow the instructions in the Units administration docs to create a new Unit before continuing.
Creating a New User Group
After you’ve created your Unit, return to the main admin page and click on the Groups link under the Auth section and then click the Add group button in the top right.
Set the Name field to Physics and choose the following set of permissions:
attachments | attachment | Can add attachment
qa | frequency | Choose QC by Frequency
qa | test instance | Can review & approve tests
qa | test instance | Can review & approve self-performed tests
qa | test instance | Can skip tests without comment
qa | test instance | Can view charts of test history
qa | test instance | Can see test history when performing QC
qa | test list instance | Can add test list instance
qa | test list instance | Can override date
qa | test list instance | Can perform subset of tests
qa | test list instance | Can save test lists as ‘In Progress’
qa | test list instance | Can view previously completed instances
qa | test list instance | Can change test list instance
qa | unit test collection | Can view tli and utc not visible to user’s groups
qa | unit test collection | Can view program overview
qa | unit test info | Can view Refs and Tols
service_log | return to service qa | Can add return to service qa
service_log | return to service qa | Can perform return to service qa
service_log | return to service qa | Can view return to service qa
service_log | service event | Can add service event
service_log | service event | Can review service event
service_log | service event | Can view service event
units | unit available time | Can change unit available time
units | unit available time edit | Can add unit available time edit
units | unit available time edit | Can change unit available time edit
Your group should look like the following:
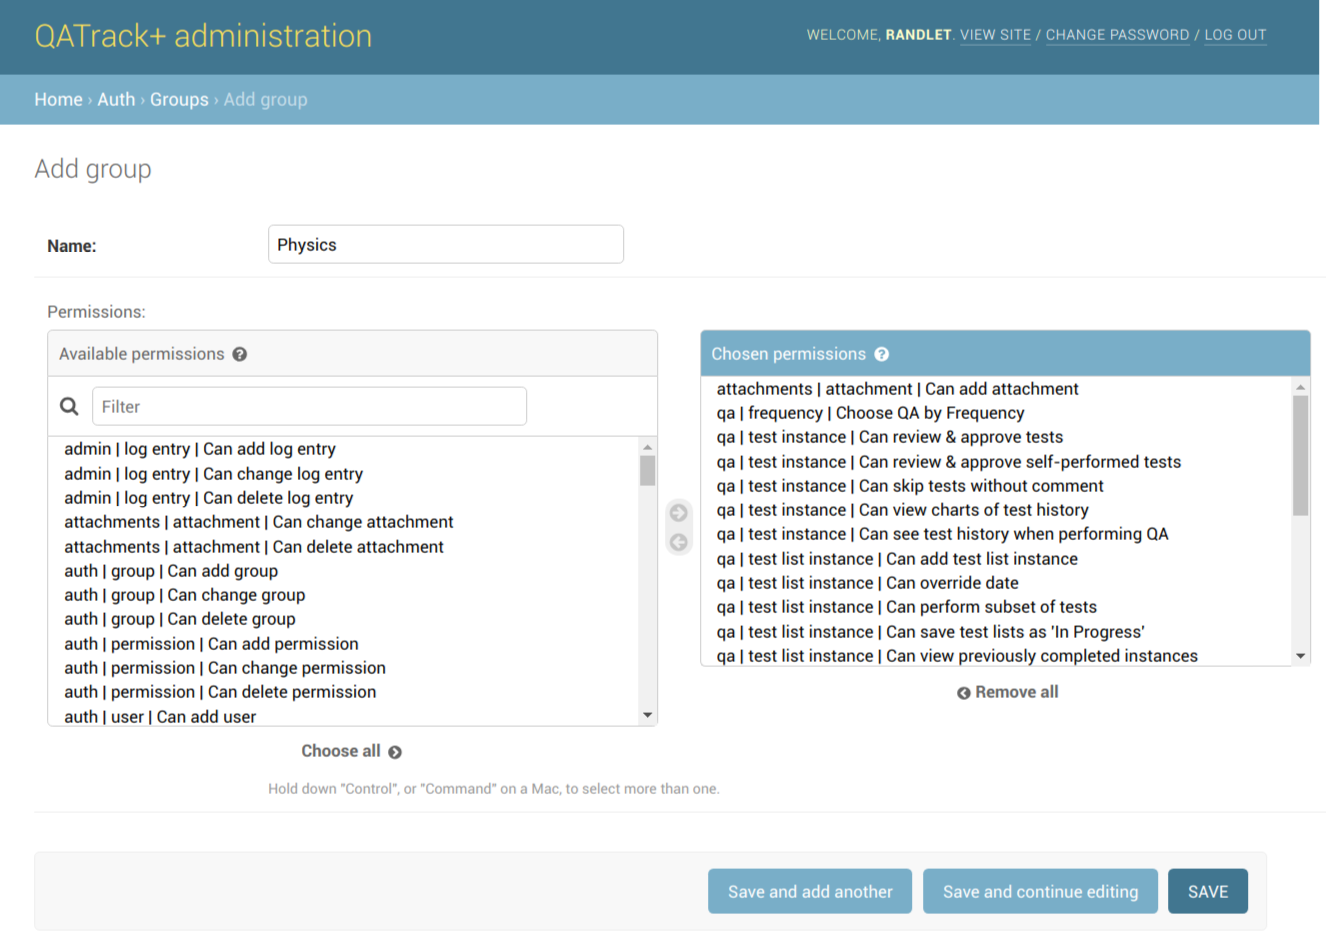
Defining a physics group
Click Save and you will now see your new group in the listings page.
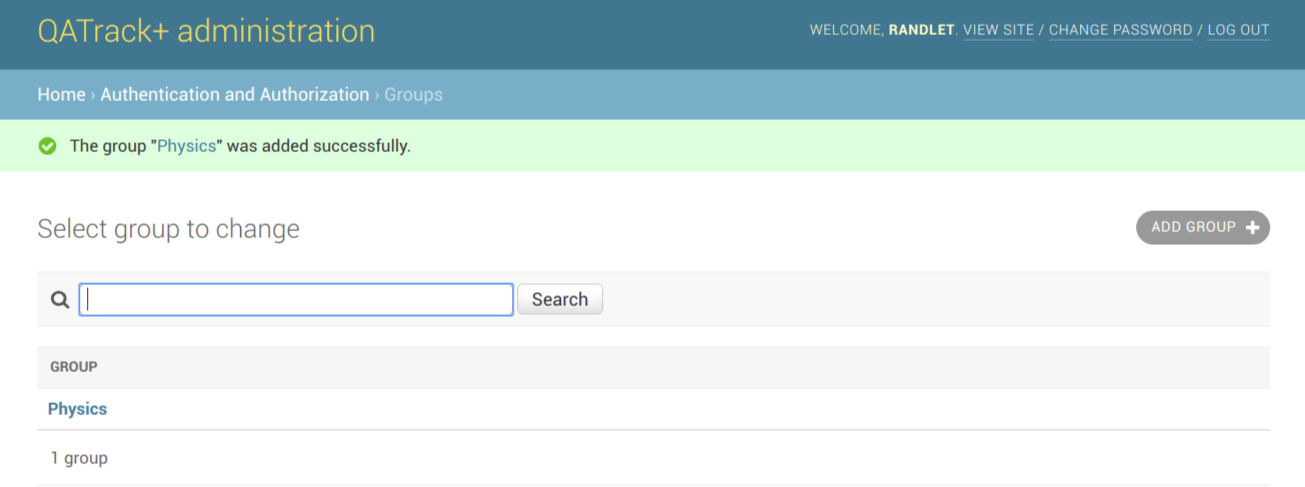
Group listings
The last step for this section is to add yourself to the Physics group. Visit your user profile by going to the Users section under the Auth section and clicking on your username.
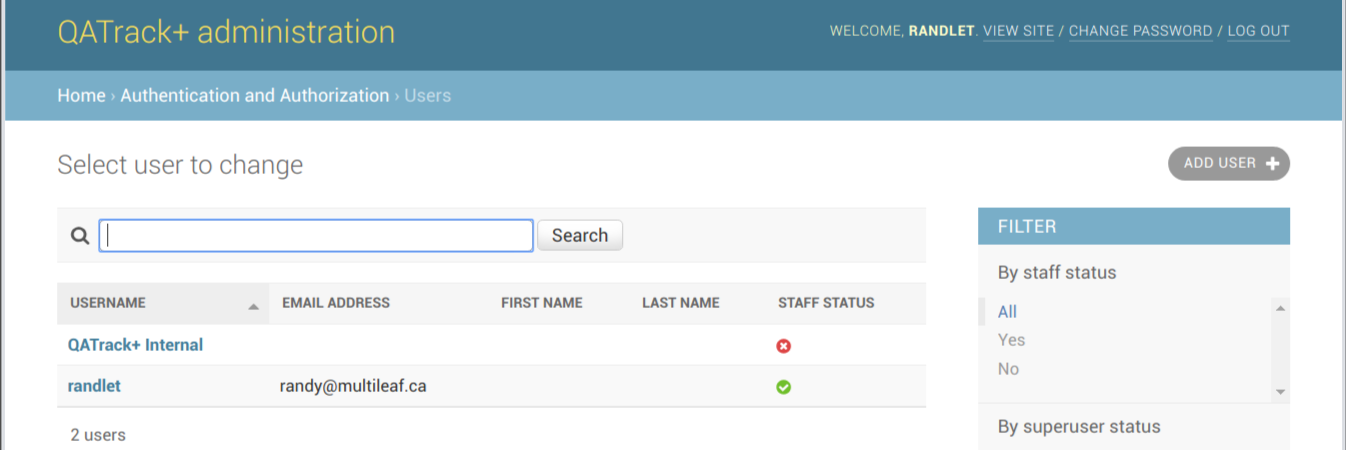
Choose a user to edit
On the next page find the Groups field and add Physics to the Chosen Groups list.
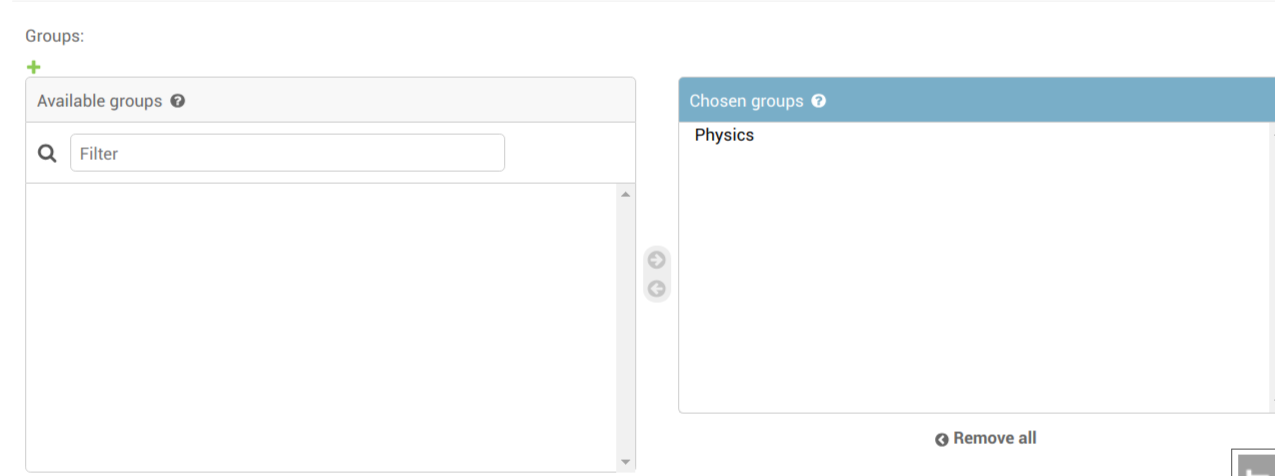
selecting a group
Click on Save to finalize the addition of yourself to the Physics group.
Creating Test Statuses
We are next going to create two test statuses; first an Unreviewed status which will be the default Test Instance Status given to test data when they are performed and second an Approved status that can be applied to the tests after they have been reviewed.
From the main admin page click on the Statuses link under the QC section and click the Add test instance status button in the top right.
Give the status a Name of Unreviewed, a Slug of unreviewed and a description of Default status for tests which have just been completed.. Next, check off the Is default checkbox and then click Save and add another.
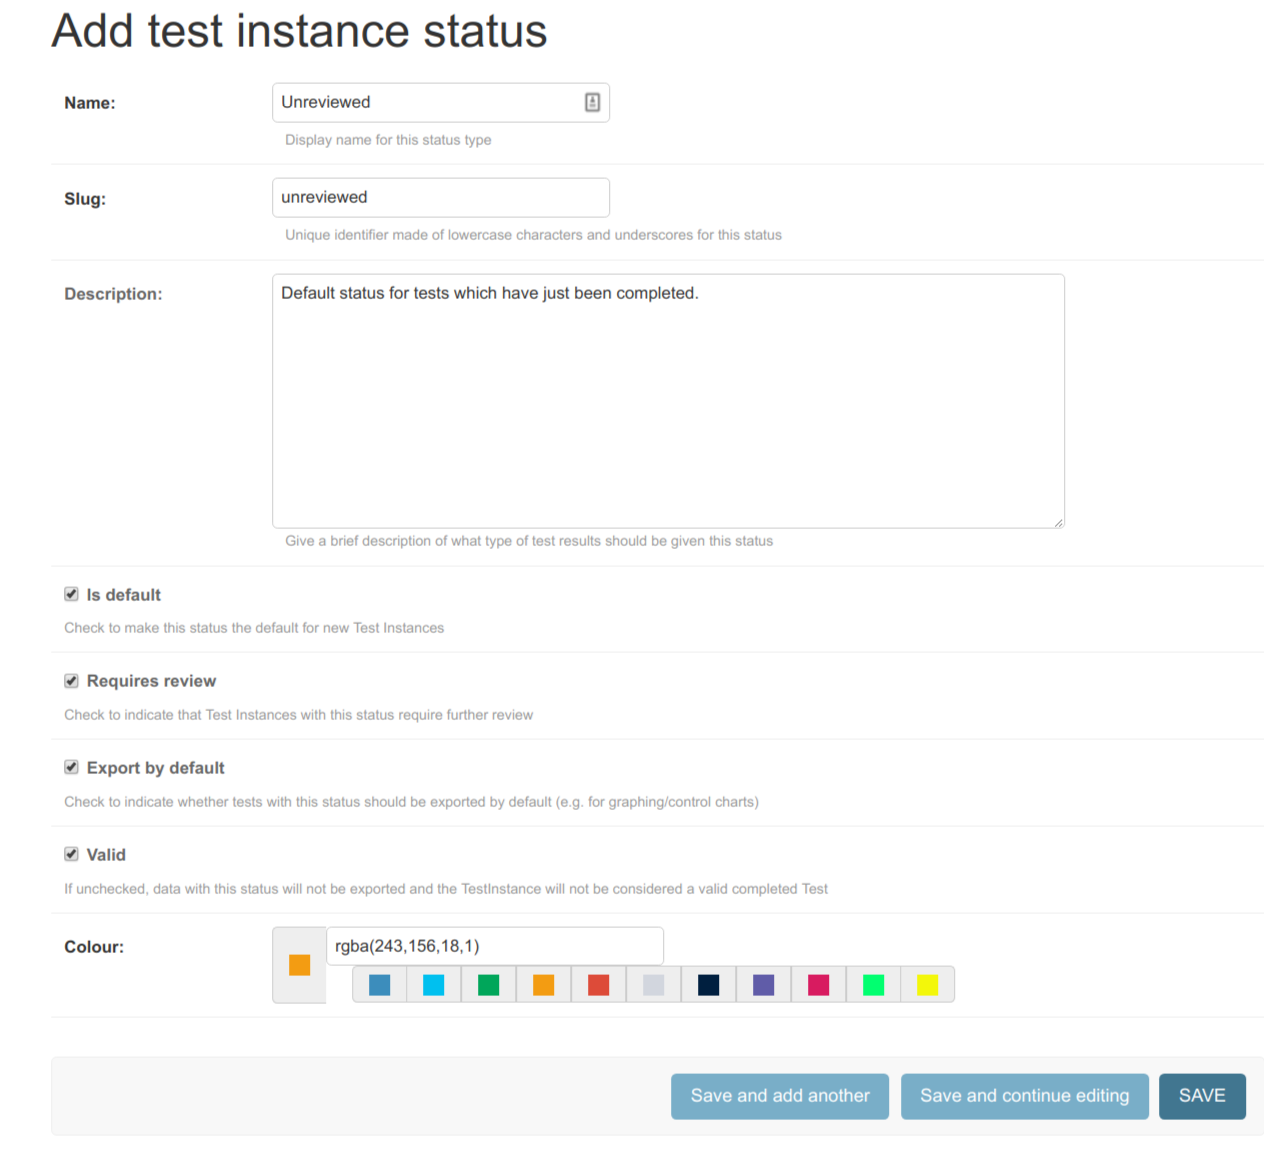
Unreviewed status
Create an Approved status similar to the Unreviewed status but this time leave the Is default box unchecked and also uncheck the Requires review checkbox. You should also select a new colour for the status (e.g. green for Approved). Click Save when you’re finished.
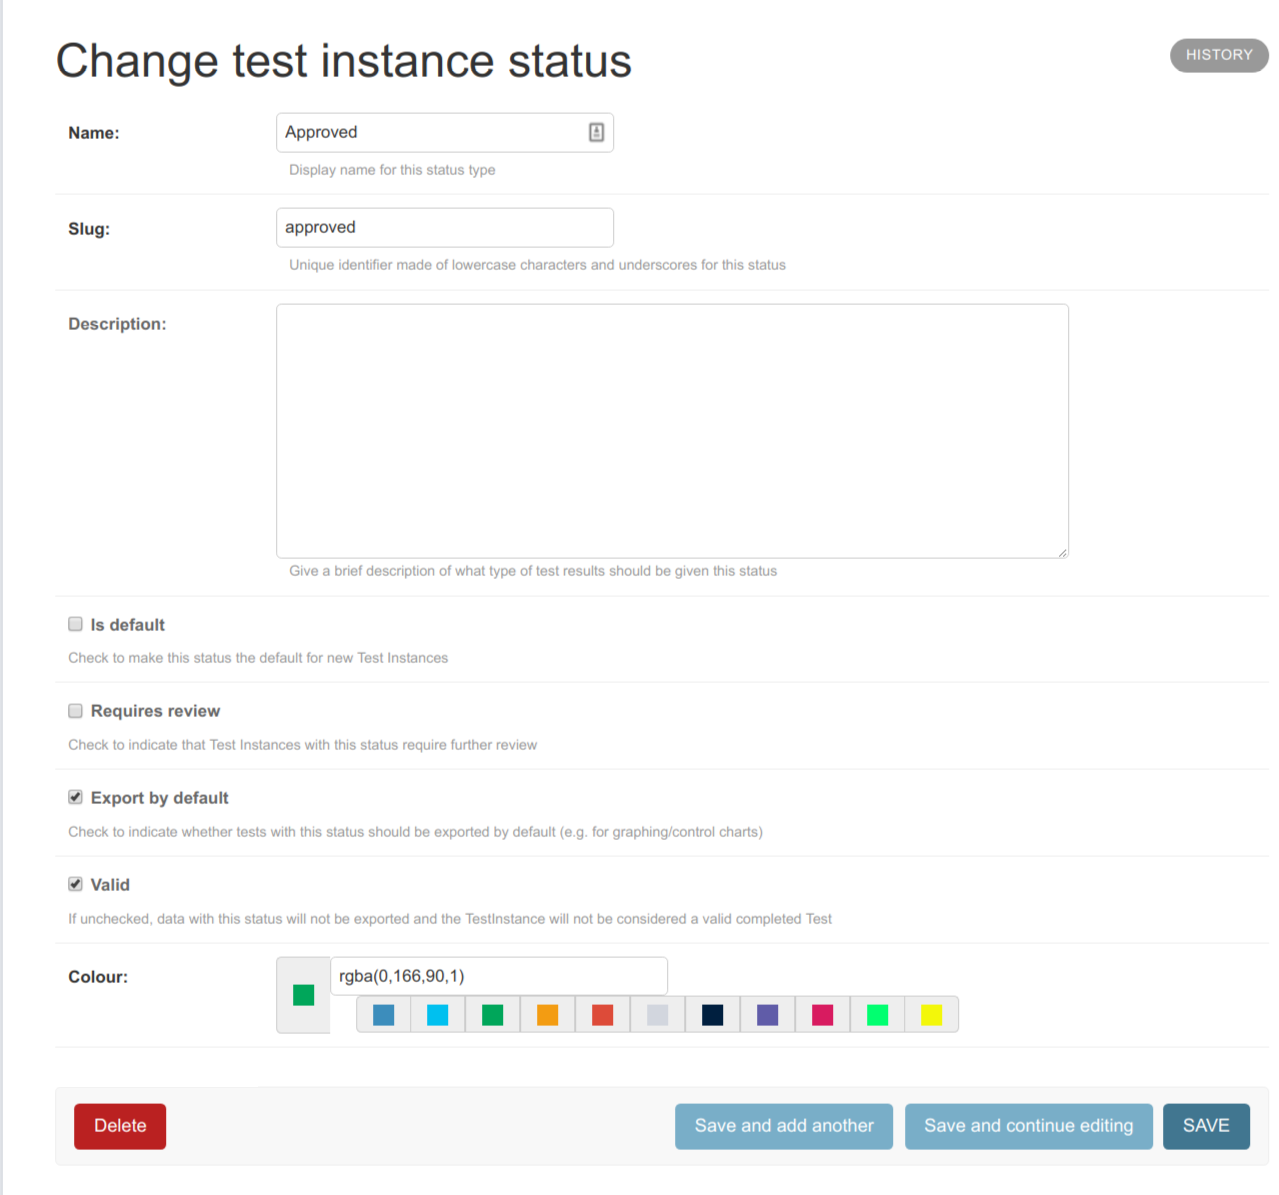
Approved status
And finally create a Rejected status similar to the Unreviewed status but this time leave the Is default box unchecked and also uncheck the Requires review and Is Valid checkboxex. You should also select a new colour for the status (e.g. red for Rejected). Click Save when you’re finished.
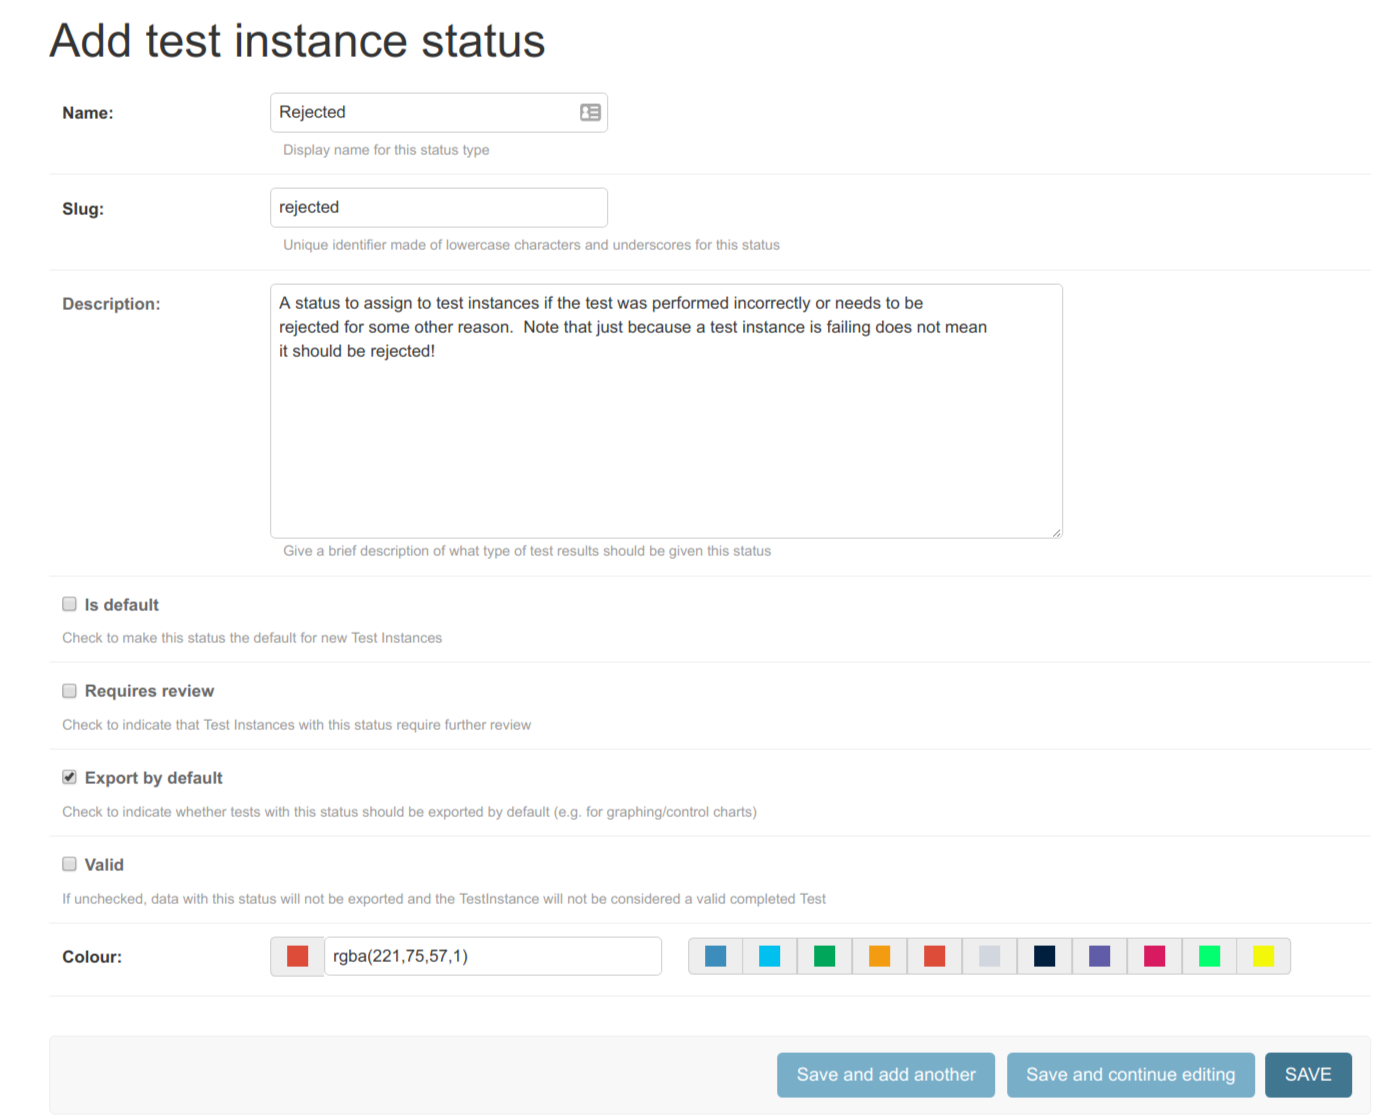
Rejected status
You should now see your three statuses in the listing.
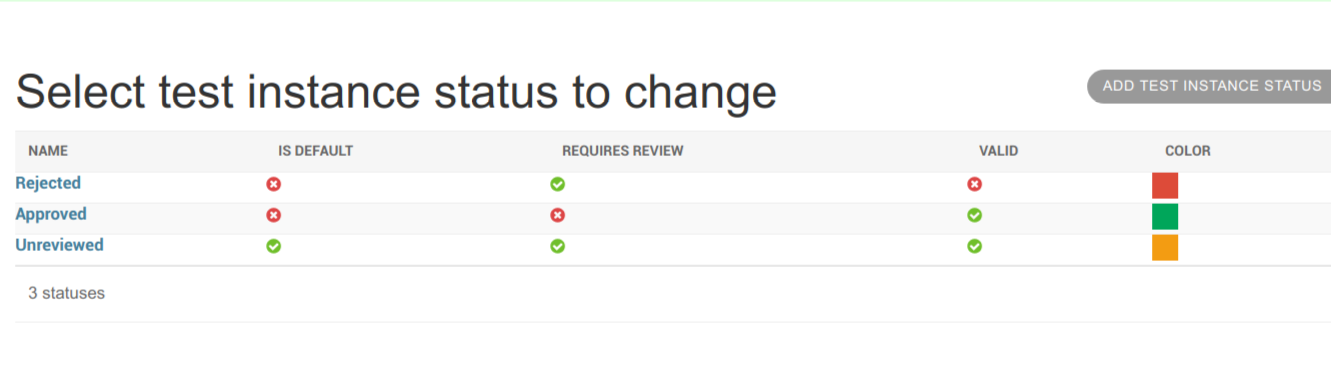
Test status listings
Now that we have done the initial configuration we can begin to cover test and test list configuration.
Creating a new Test List
Creating the required Tests
In this part of the tutorial we will create the tests required to calculate a dose. This will demonstrate a number of different test types including composite calculations.
In order to calculate dose we need to create 6 tests (k_Q and Other corrections such as P_pol, P_ion etc are ignored for simplicity):
Temperature (numerical test)
Pressure (numerical test)
Temperature-pressure correction (Ftp - a composite calculation)
Ion chamber reading (numerical test)
Ndw for converting our ion chamber reading to dose (constant value)
Dose (the final result we are interested in - a composite calculation)
To create the tests, visit the Tests link under the QC section from the main admin page and then click on Add test in the top right hand corner.
Give our first test the name Temperature °C and the macro name of temperature. We will leave the description blank for now.
Since we haven’t created any [categories](../categories.md) yet we will do so now. Click the green cross next to the Category: drop down and create a Dosimetry category.
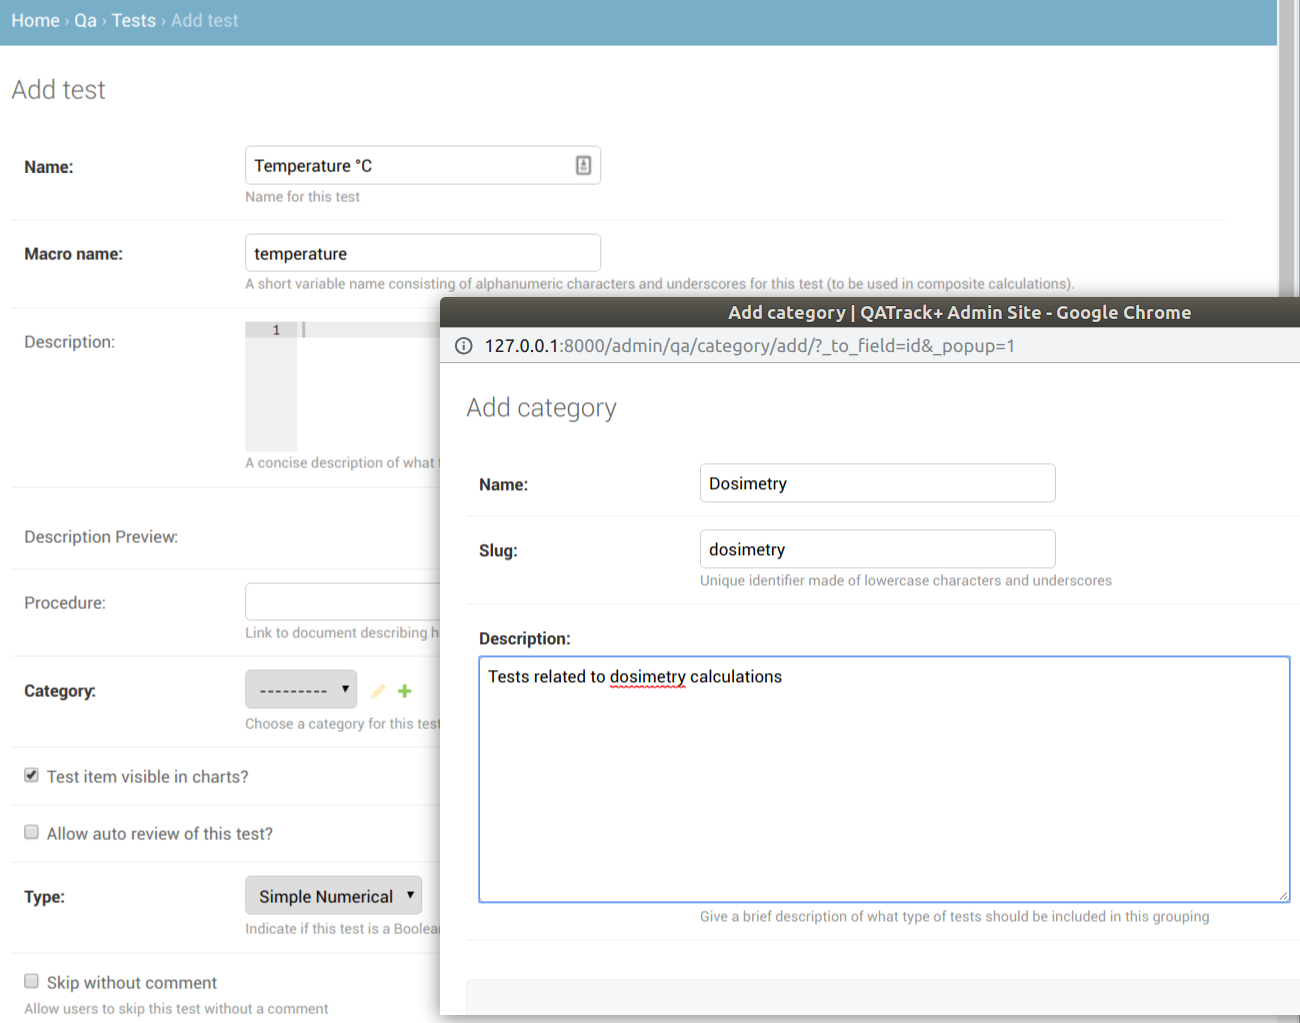
creating a dosimetry category
For the Type field choose Simple Numerical, indicating that this test will require the user to enter a number. You may also check the Allow auto review of this test? checkbox if you intend to use auto review.
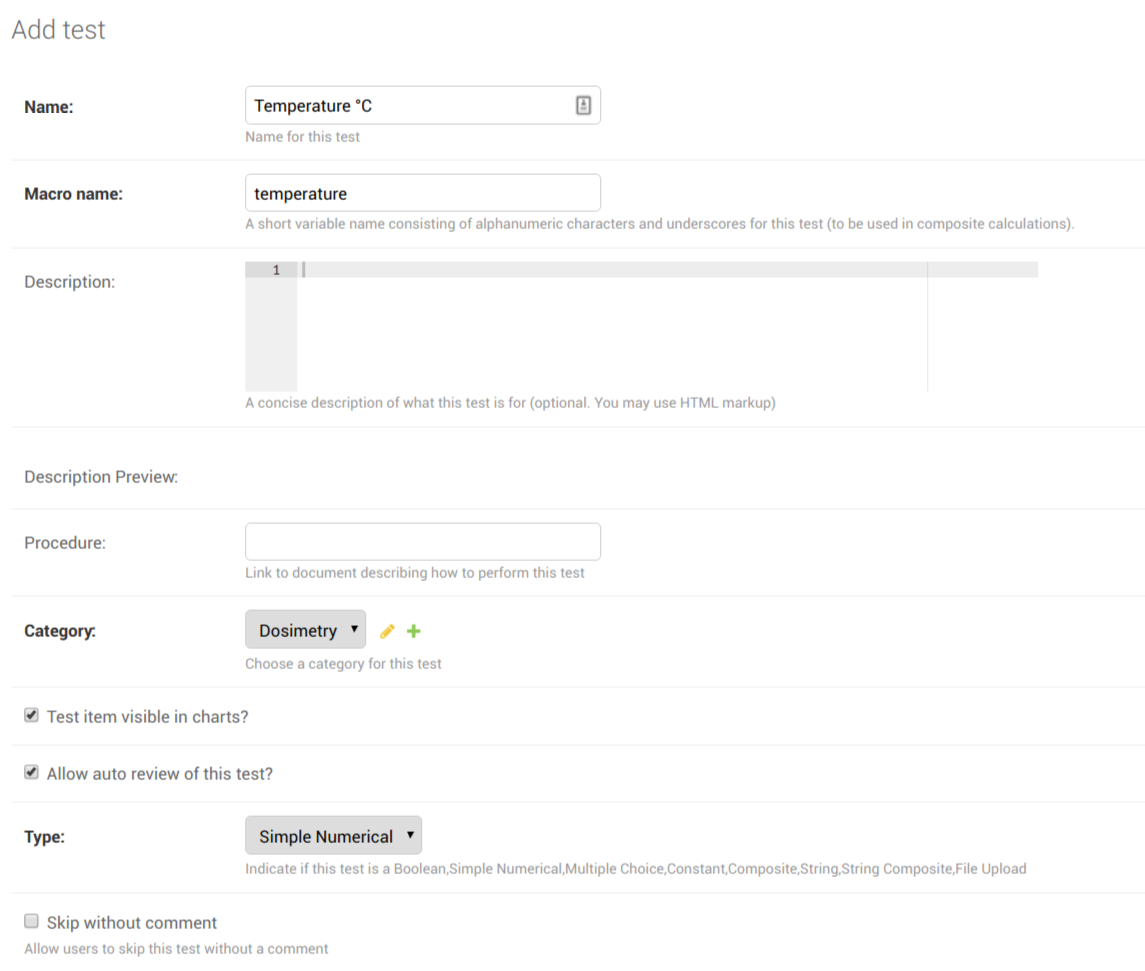
Full temperature test
Click Save and add another when you are done.
Follow the same procedure define 1) a Pressure (mmHg) test ensuring that you use the macro name pressure (You can use the Dosimetry category we created earlier for the pressure and all of the remaining tests), and 2) an Ion Chamber Reading (nC) test using the macro name reading.
Next we will create our first composite test for our temperature pressure correction. Give this test a name of Temperature-Pressure Correction and a macro name of p_tp. From the Type: dropdown select Composite and you will notice that a new Calculation Procedure text box will appear below. In that text box enter the following Python snippet:
p_tp = (temperature + 273.15)/295.15*760/pressure
Note here that we used the macro names temperature and pressure from our previously defined tests to define how our Temperature Pressure Correction test result will be calculated.
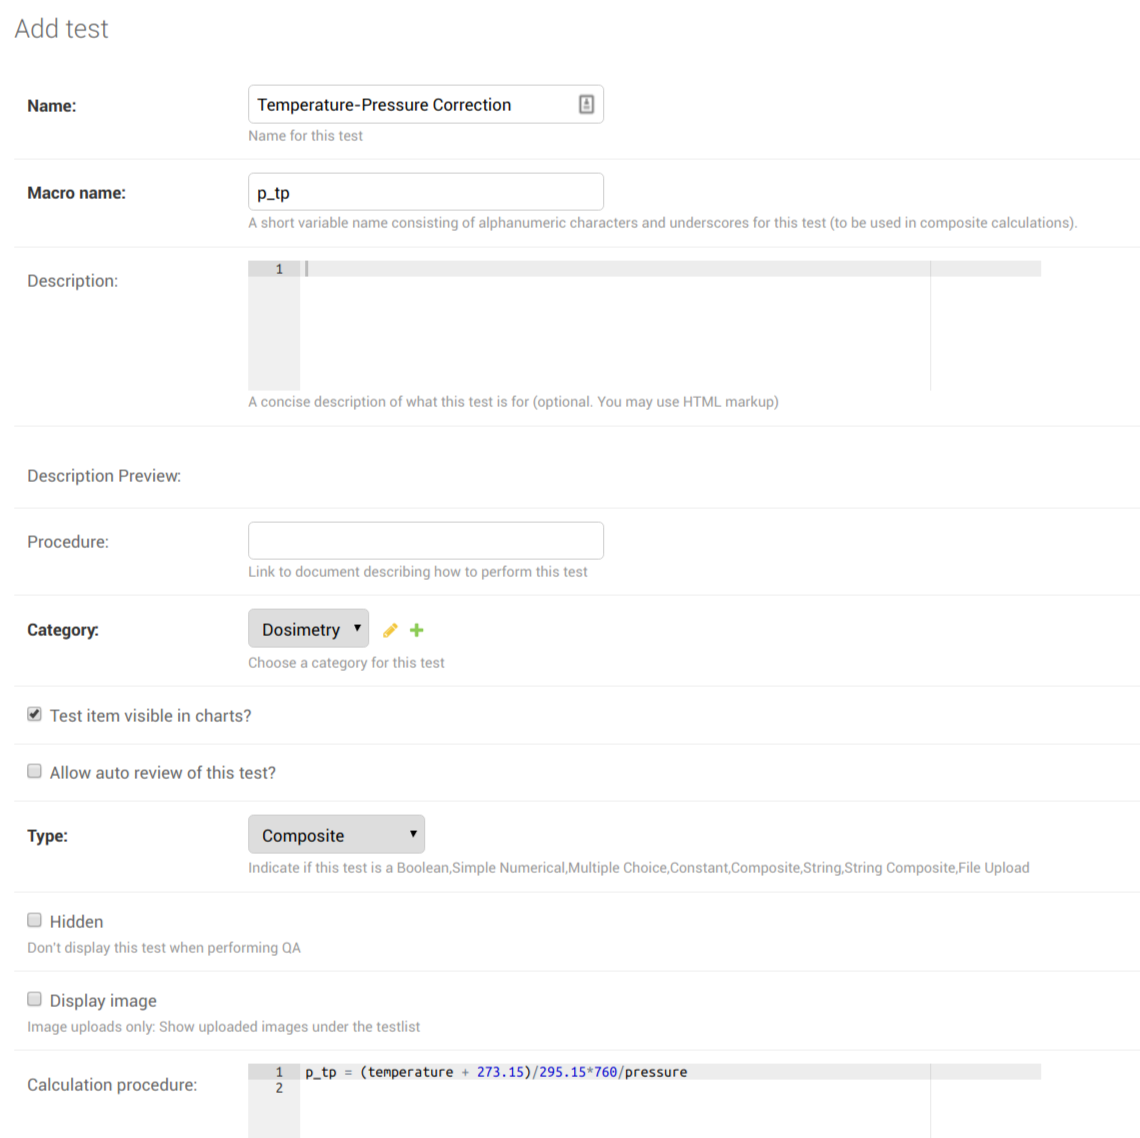
P_TP calculation
When you are finished, click Save and add another. Define a test called N_DW with the macro name n_dw. This time choose a Type of Constant and enter a value of 0.05 in the Constant value field that appears.
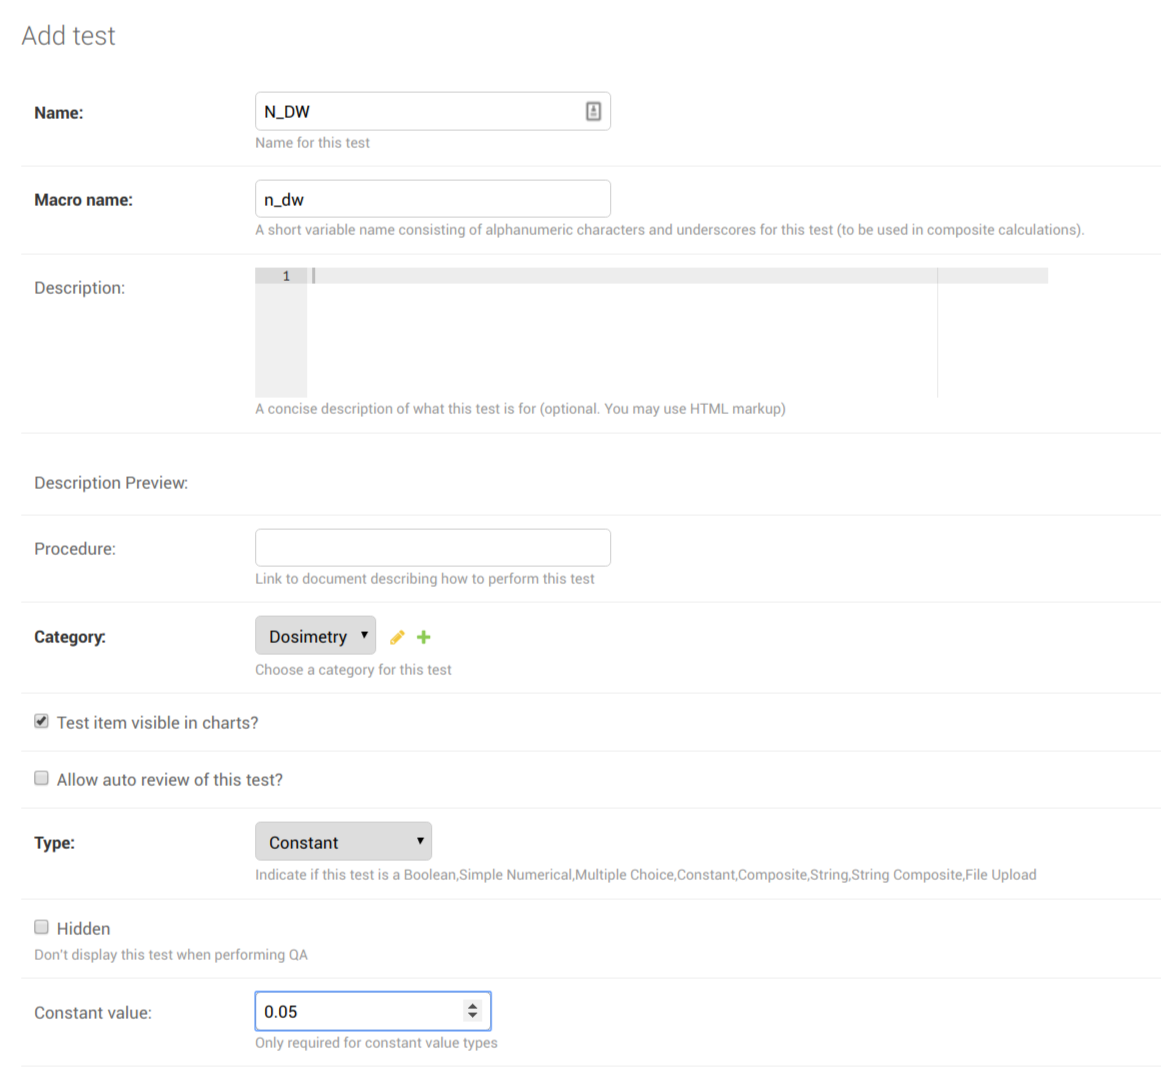
N_DW
Once that is finished we will add our final test for calculating dose. Create a composite test with the name Dose, the macro name dose and a calculation procedure defined as:
corrected_reading = reading*p_tp dose = n_dw*corrected_reading
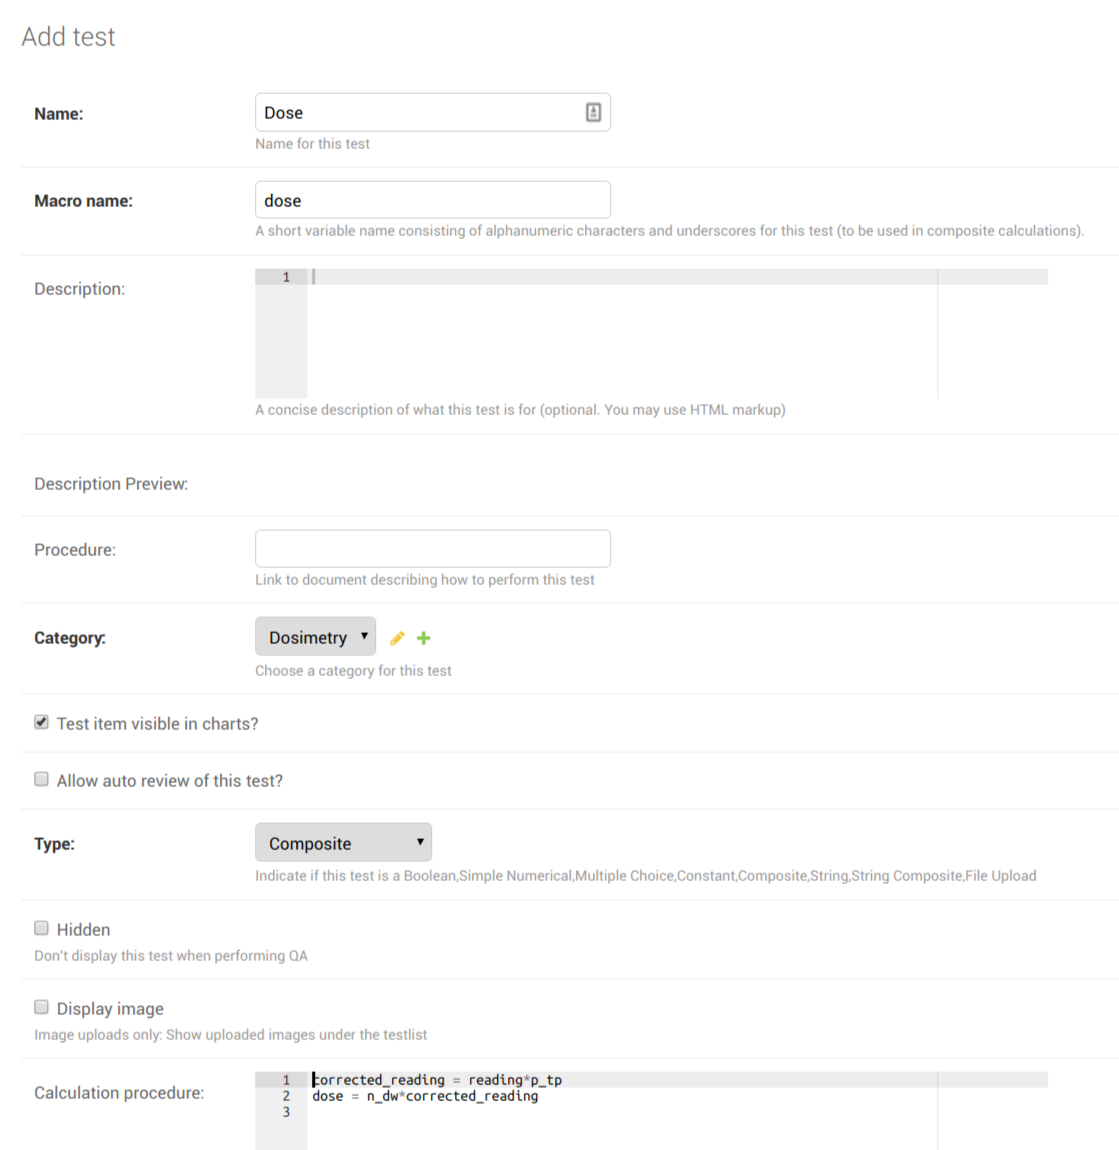
dose test
Note
Note that the dose calculation is a composite test based on a previous composite result (p_tp). QATrack+ has a dependency resolution system to allow this sort of composite-of-composite type calculations.
Once that is complete click on Save which will take you back to the test listings. If all the steps have been completed correctly you should see 6 tests listed:
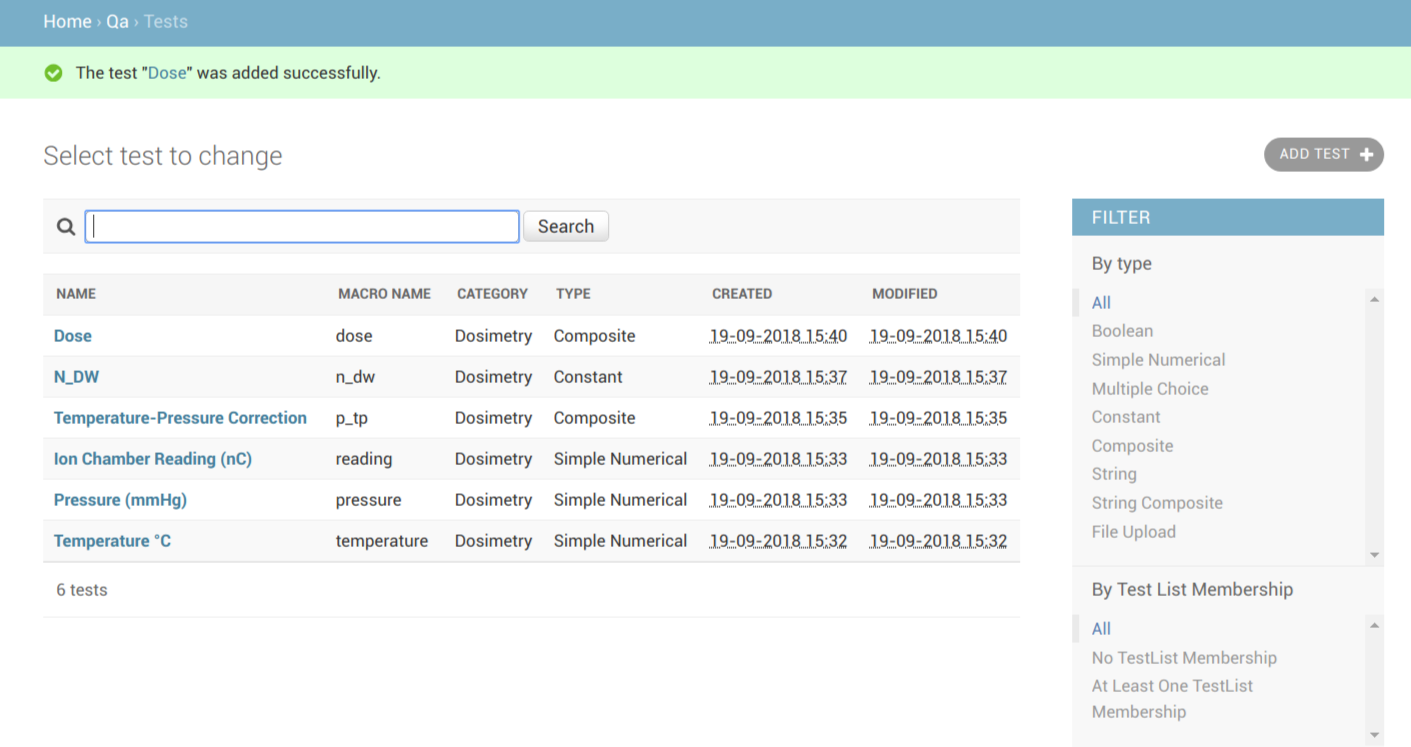
Test listings for dose calculations
In the next step of the tutorial we will group these tests into a test list.
Creating the Test List
To create the test list, visit the Test Lists link under the QC section from the main admin page and then click on Add test list in the top right hand corner.
Give the test list the name Machine Output and slug machine-output. We will ignore the description fields for now.
Under the Test List Members section click on green cross / Add another Test list membership link at the bottom to make a 6th Test text box appear (you can ignore the Sublist text box, it allows you to include other Test Lists within a parent Test List). Now click the first magnifying glass and click on the Temperature test in the window that pops up:

Selecting a test
Repeat this step for the other 5 tests we defined at which point the Test list memberships section should look like:
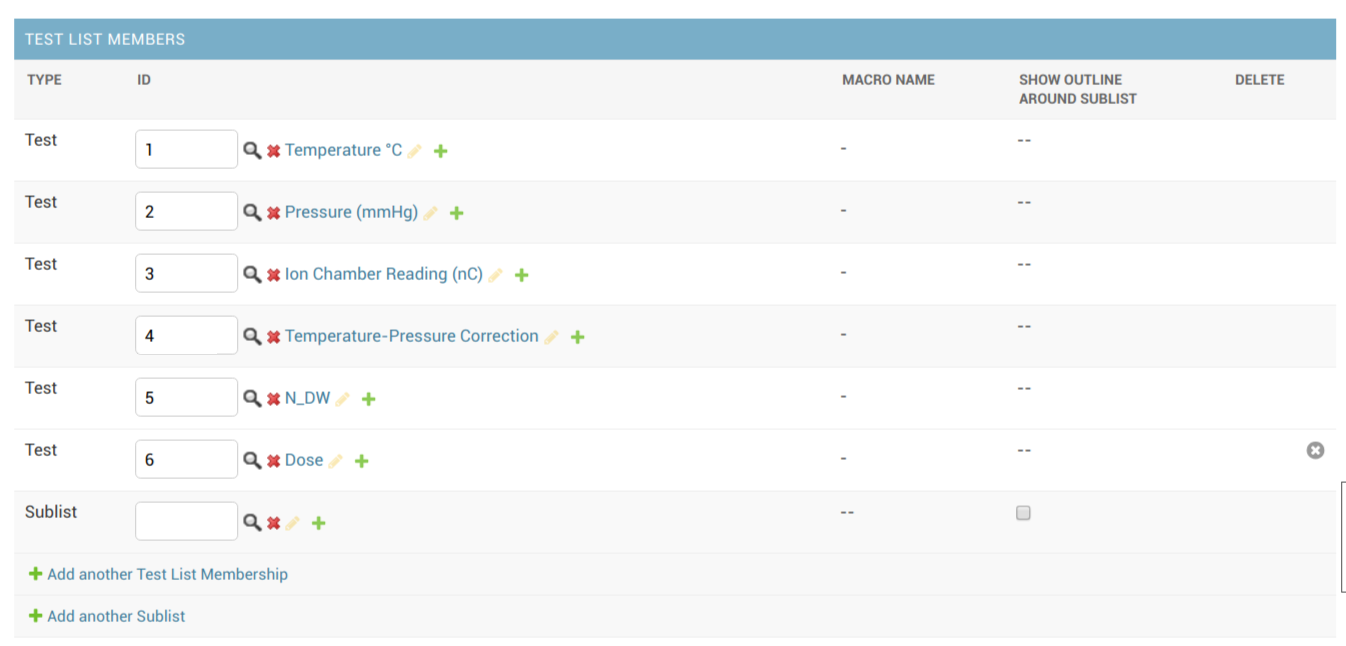
Test list memberships
Now click Save and that’s it! Now that we’ve created our tests and test list we can assign it to the unit we created earlier. This is covered in the next step of this tutorial.
Assigning the test list
In this part of the tutorial we will assign our test list to a unit and ensure that it is functioning correctly on the main site.
To assign the test list to a unit, visit the Assign Test Lists to Units link under the QC section from the main admin page and then click on Add unit test collection in the top right hand corner.
Select the Test Unit from the Unit: dropdown, and then create a new [frequency](../frequencies) by clicking on the green cross next to the Frequency dropdown. Give the frequency the name Monthly, slug monthly and enter 28, 28, 35 for Nominal interval, Due Interval and for Overdue interval, respectively.
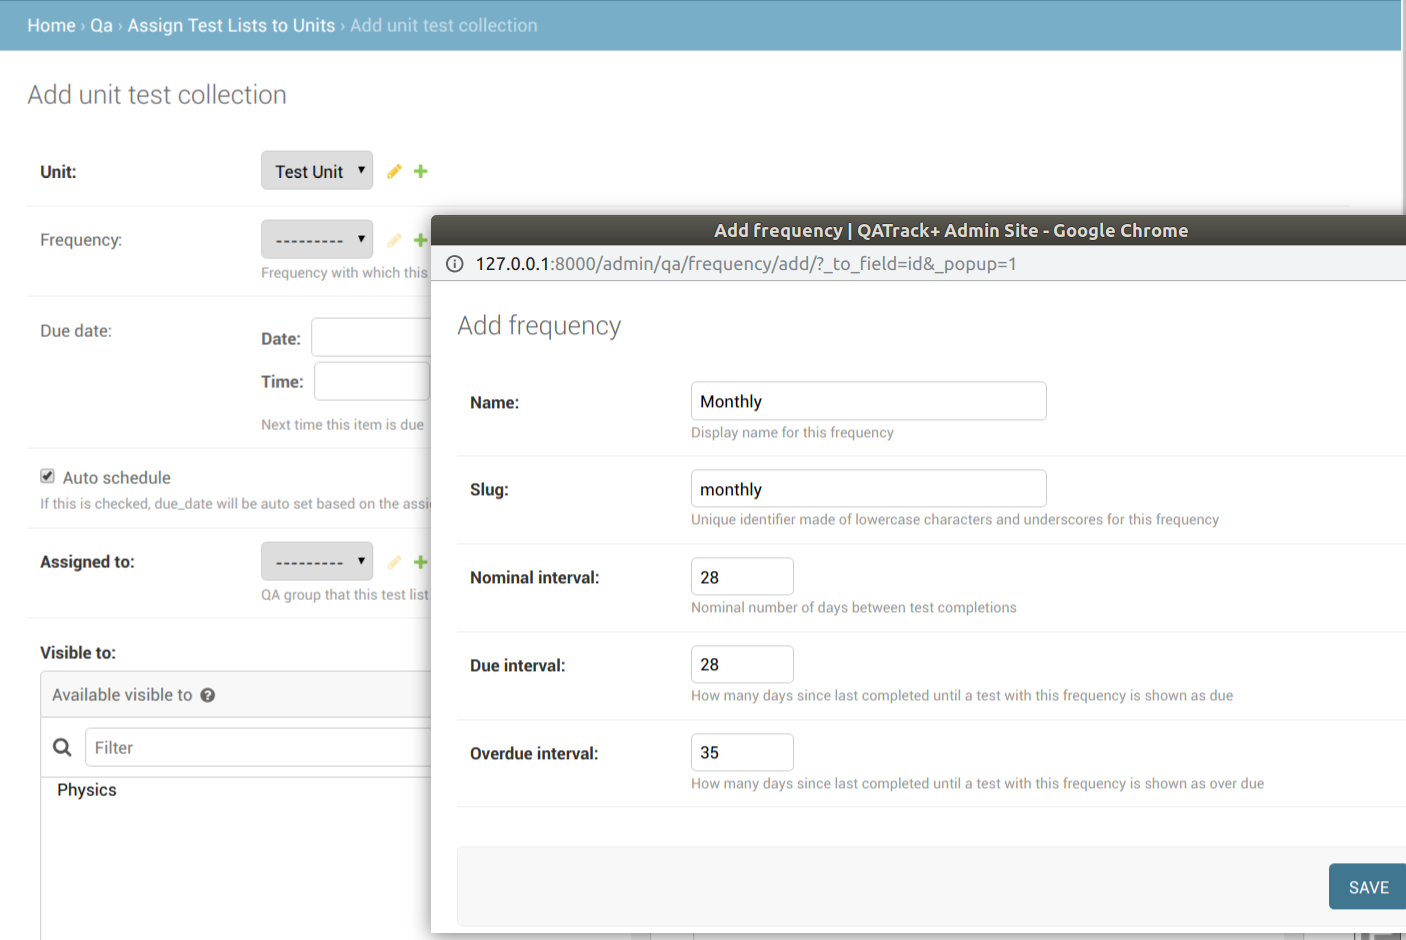
creating a new frequency
Select the Physics option from the Assigned to: dropdown and add the Physics group to the Visible to section.
Next select test list from the Test List or Test List Cycle dropdown. After selecting test list you will be able to select Machine Output from the Tests collection dropdown.
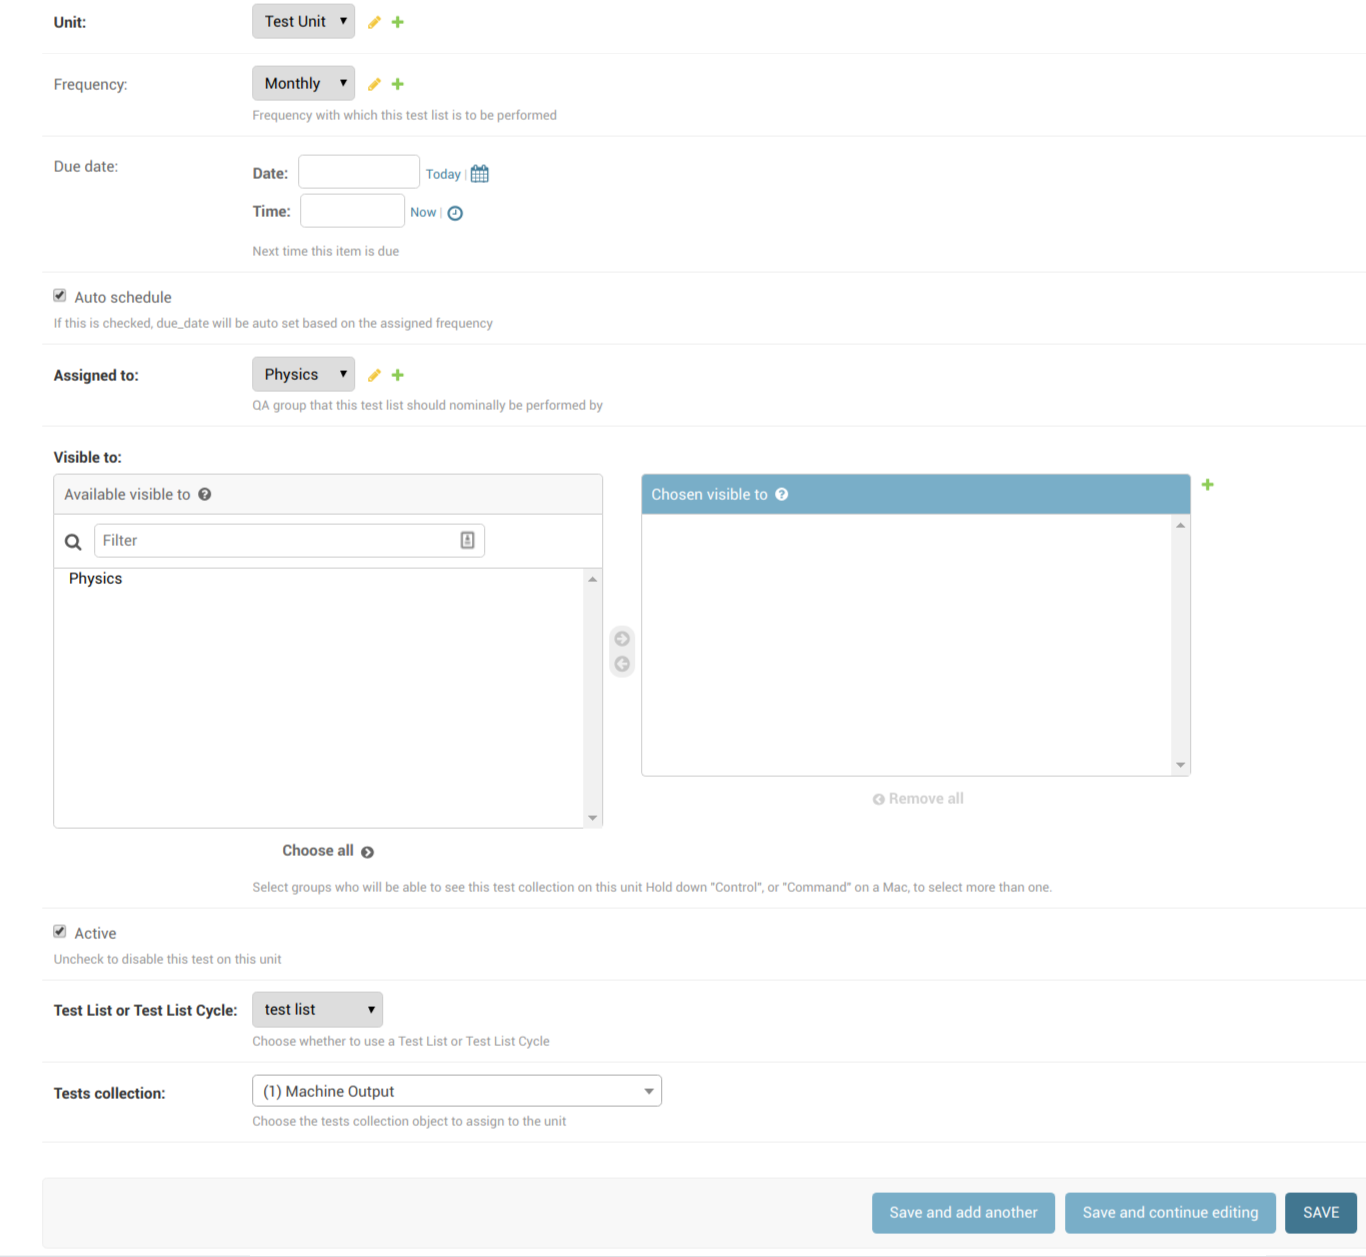
Assigning to a unit
When you’re finished click Save. We can now set a reference and tolerance value for the dose calculated by our Test List.
To assign the test list to a unit, visit the Set References and Tolerances link under the QC section from the main admin page and then click on the Dose link for the Test Unit.
Create a new Tolerance by clicking the green cross beside the Tolerance field. Select Percentage for the Type and set Action Low = -3, Tolerance Low = -2, Tolerance High = 2, and Action High = 3 and then click Save. This will create a Tolerance which signals the user if a test is outside of tolerance (2%) or action (3%) levels relative to the reference value.
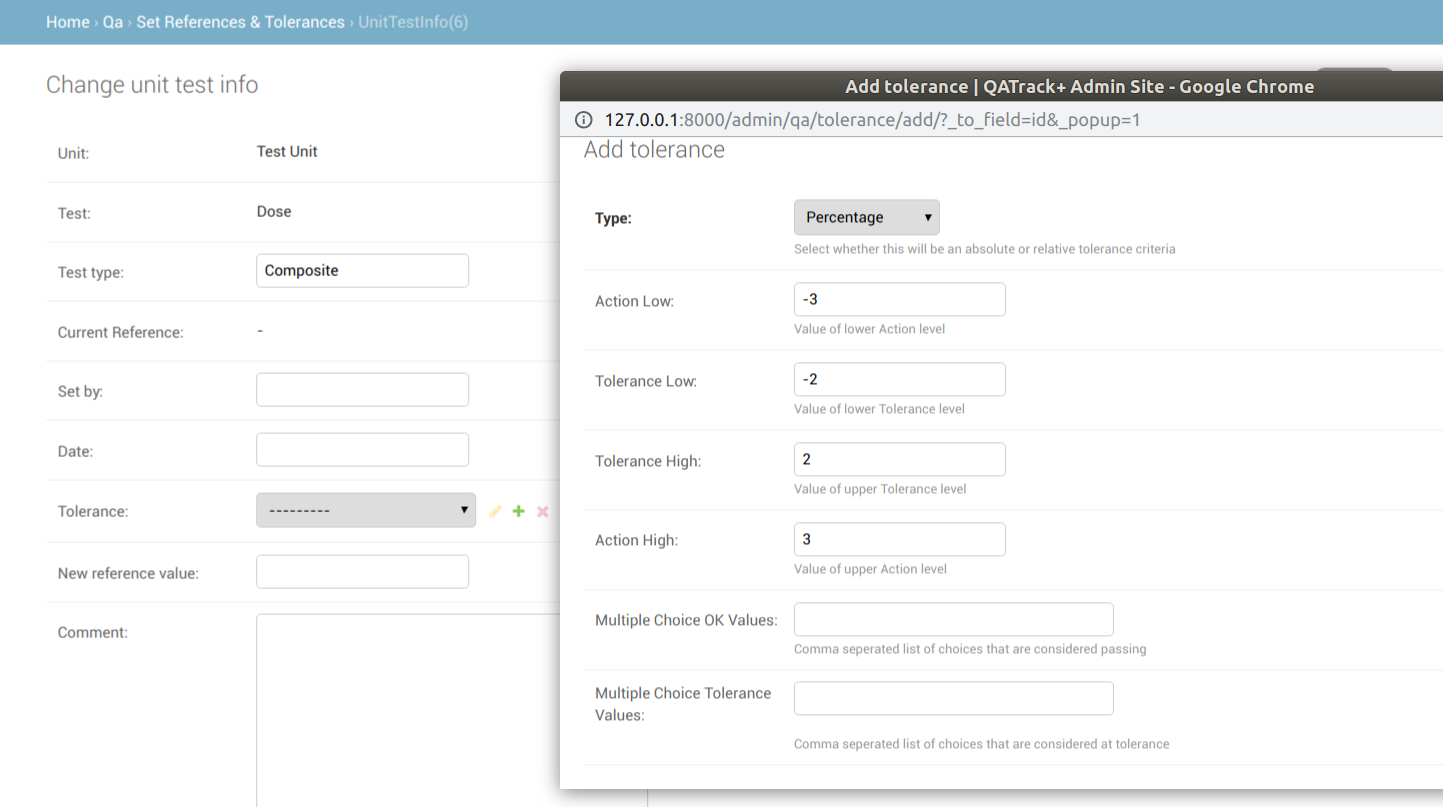
Creating a new tolerance
Set the New reference value to 1 and then click Save. We are now ready to perform the test list.
Performing the Test List
Visit the main site (you can click the QATrack+ administration header at the top of the admin page) and select the Choose Unit link from the Perform QC dropdown at the top of the page. On the next page choose the Monthly option from the Test Unit drop down.
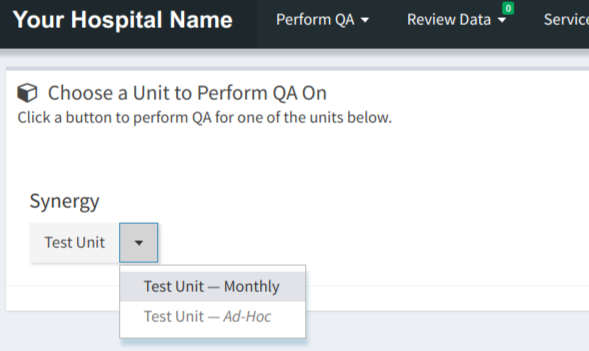
Choosing Monthly
On the next page click Perform beside the Machine Output test list.
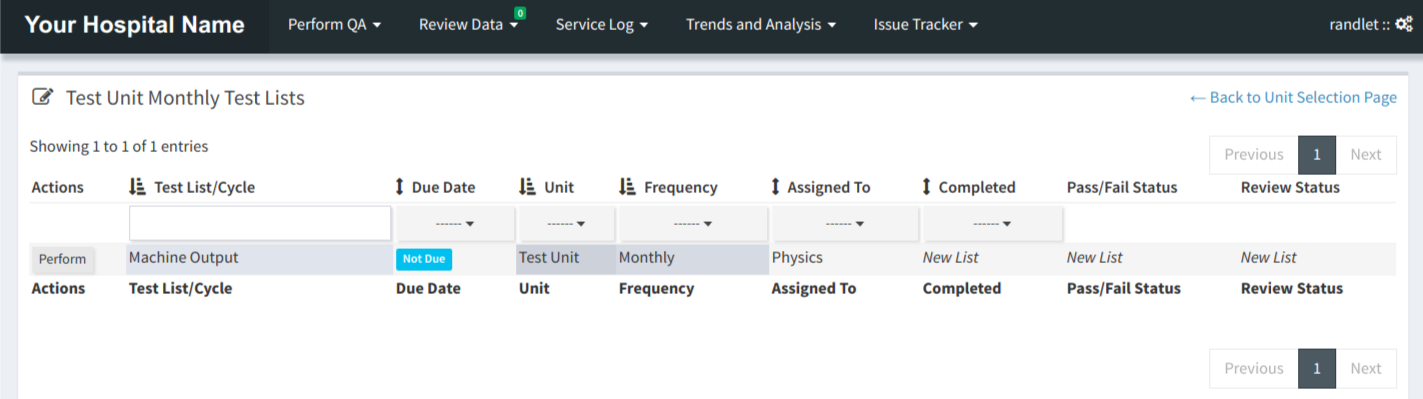
Monthly test listings
You should now see the test list you defined:
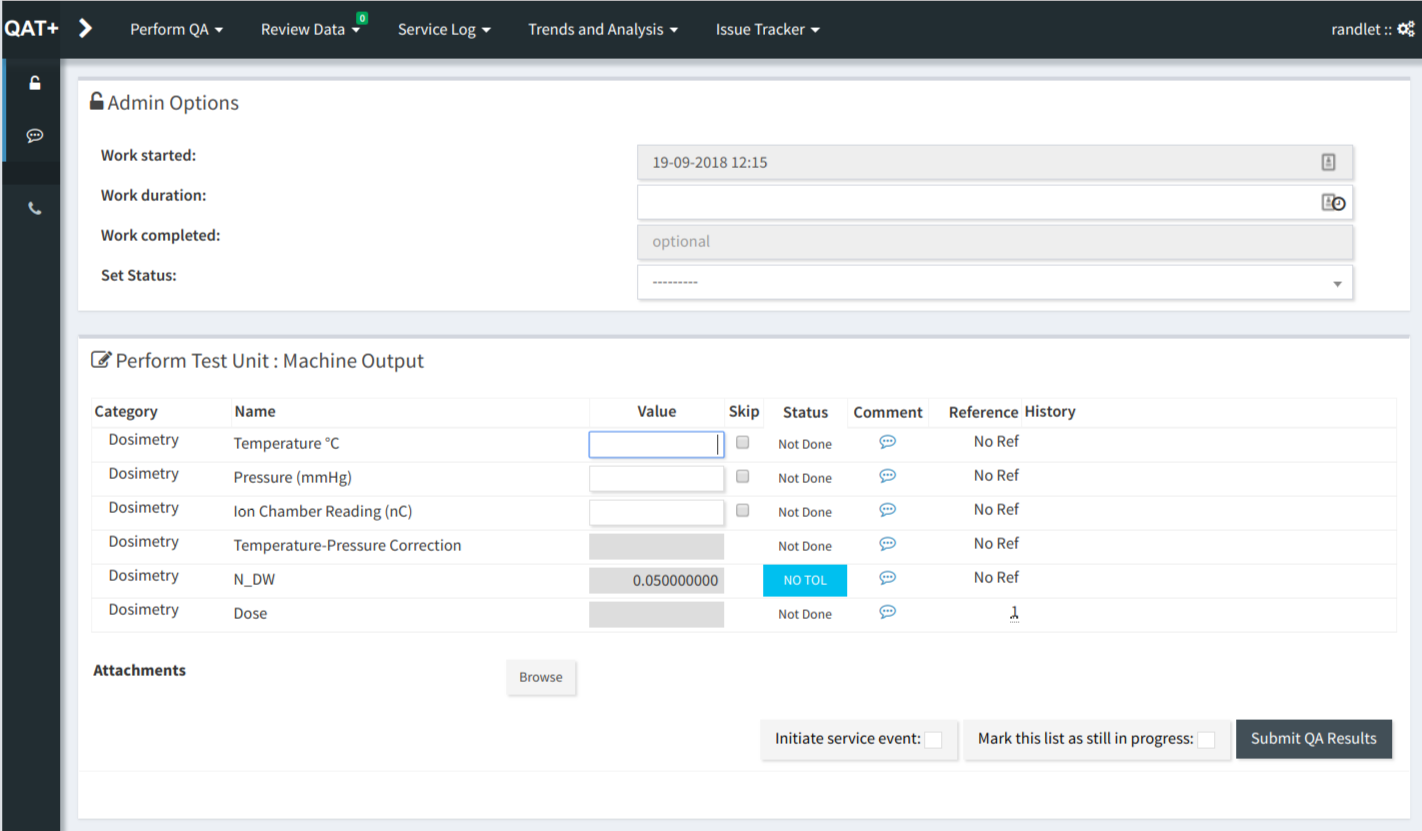
Final test list
Fill in sample values of :
Temperature = 24
Pressure = 760
Ion Chamber Reading = 20.2
And you should see the Temperature-Pressure Correction and Dose values calculated as 1.007 and 1.017 respectively. The Status column next to Dose should indicate the Test is within tolerance.
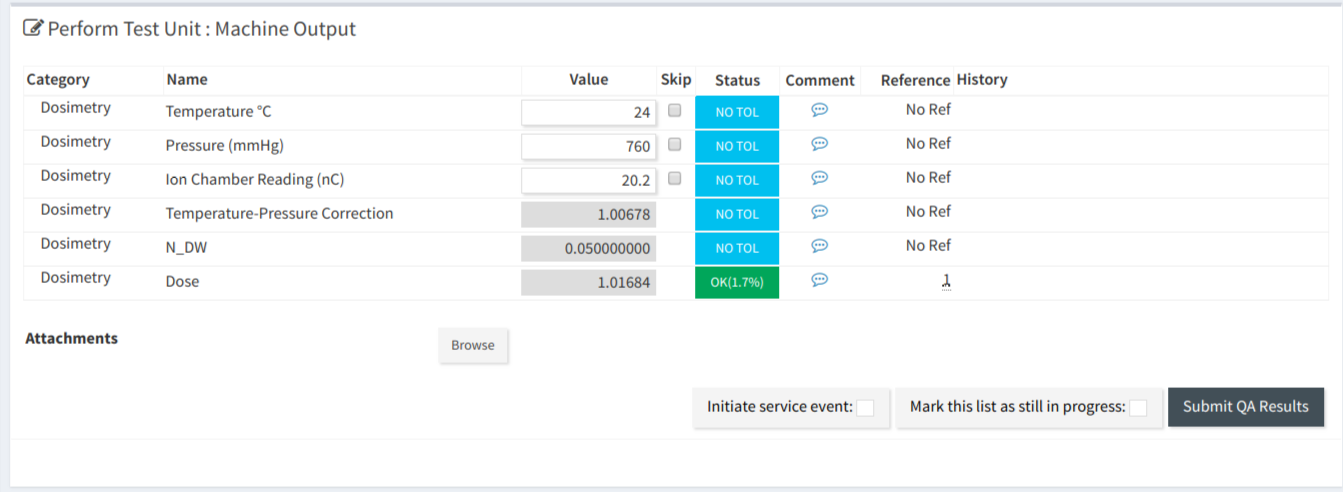
Calculated results
Notice that the Status for all the other tests all show No Tol Set. This is because we haven’t set reference values and tolerance/action levels for these tests. For more information on Reference & Tolerance values see here.
You may now click Submit QC Results and you will be returned to the previous page. You should notice at the top of the page that there is now an indication that there is 1 unreviewed Test List Instance:
Visual indicators of review queue
Reviewing the Data
Periodically whoever is responsible for ensuring QC has been completed satisfactorily should go through all unreviewed Test List Instances and update their status to either Approved or Rejected (note rejected is to be used if a Test was performed incorrectly, not if it was performed correctly but failing).
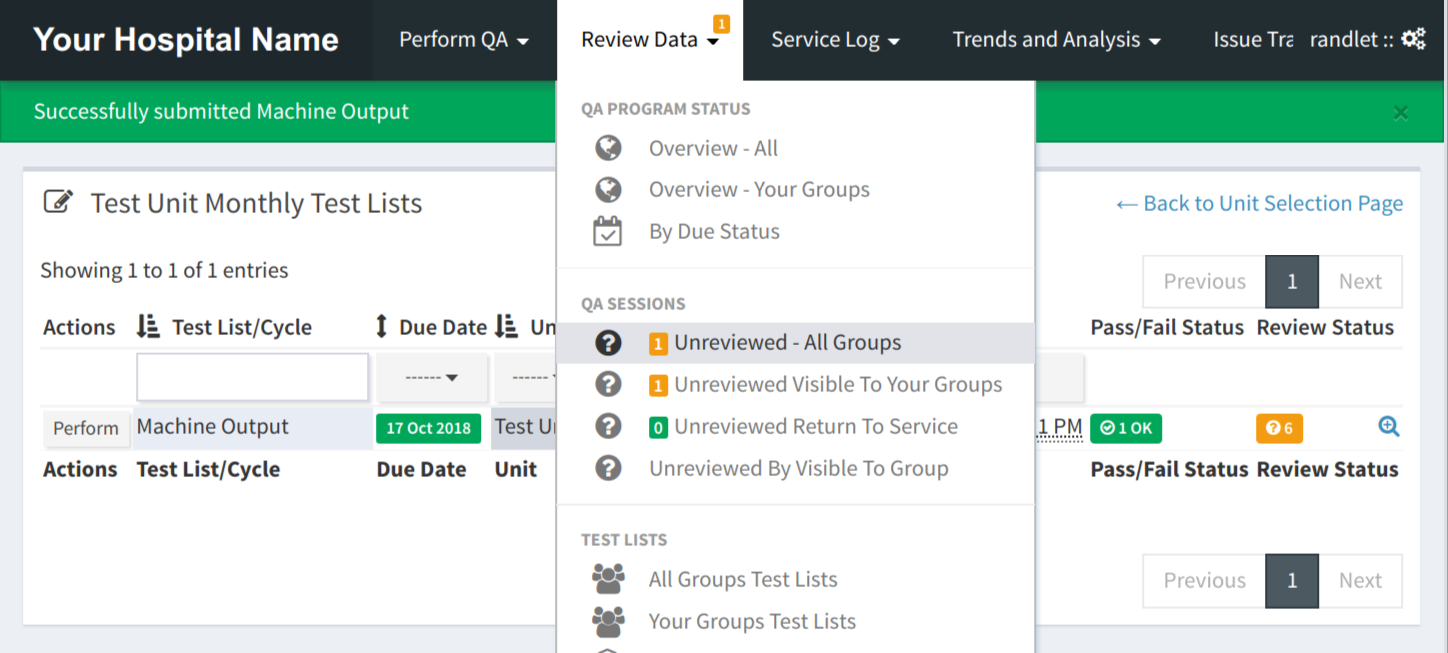
Select the Unreviewed - All Groups menu item from the Review Data menu and then click Review beside the Test List Instance we just performed:
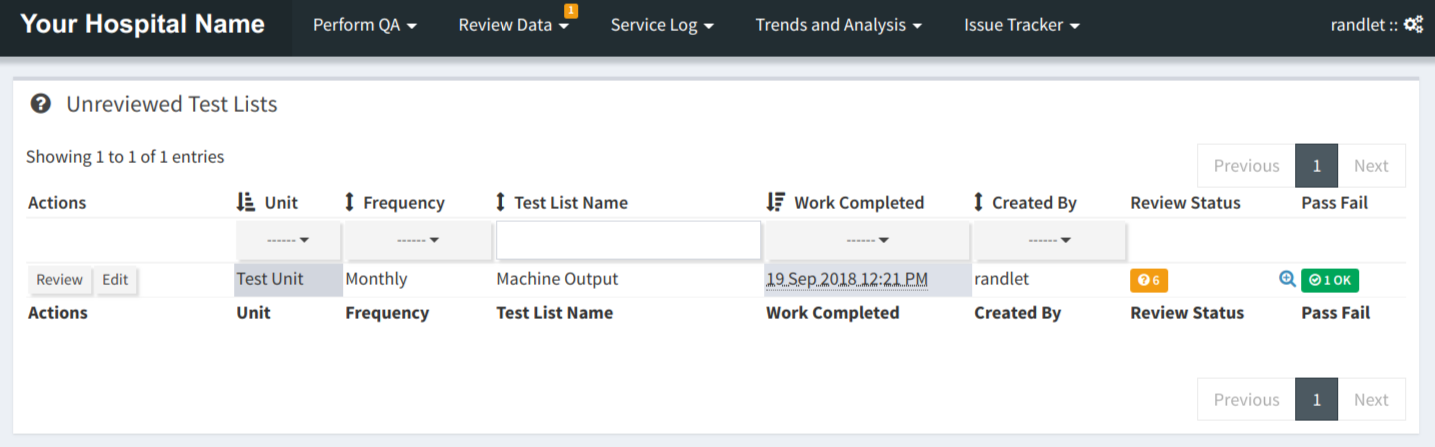
Unreviewed Test Lists
On the next page you will see details of the Test List Instance. Select the Approved status from the Status drop down to change the status from Unreviewed. Add a comment at the bottom of the page if desired and then click Update Test Statuses.
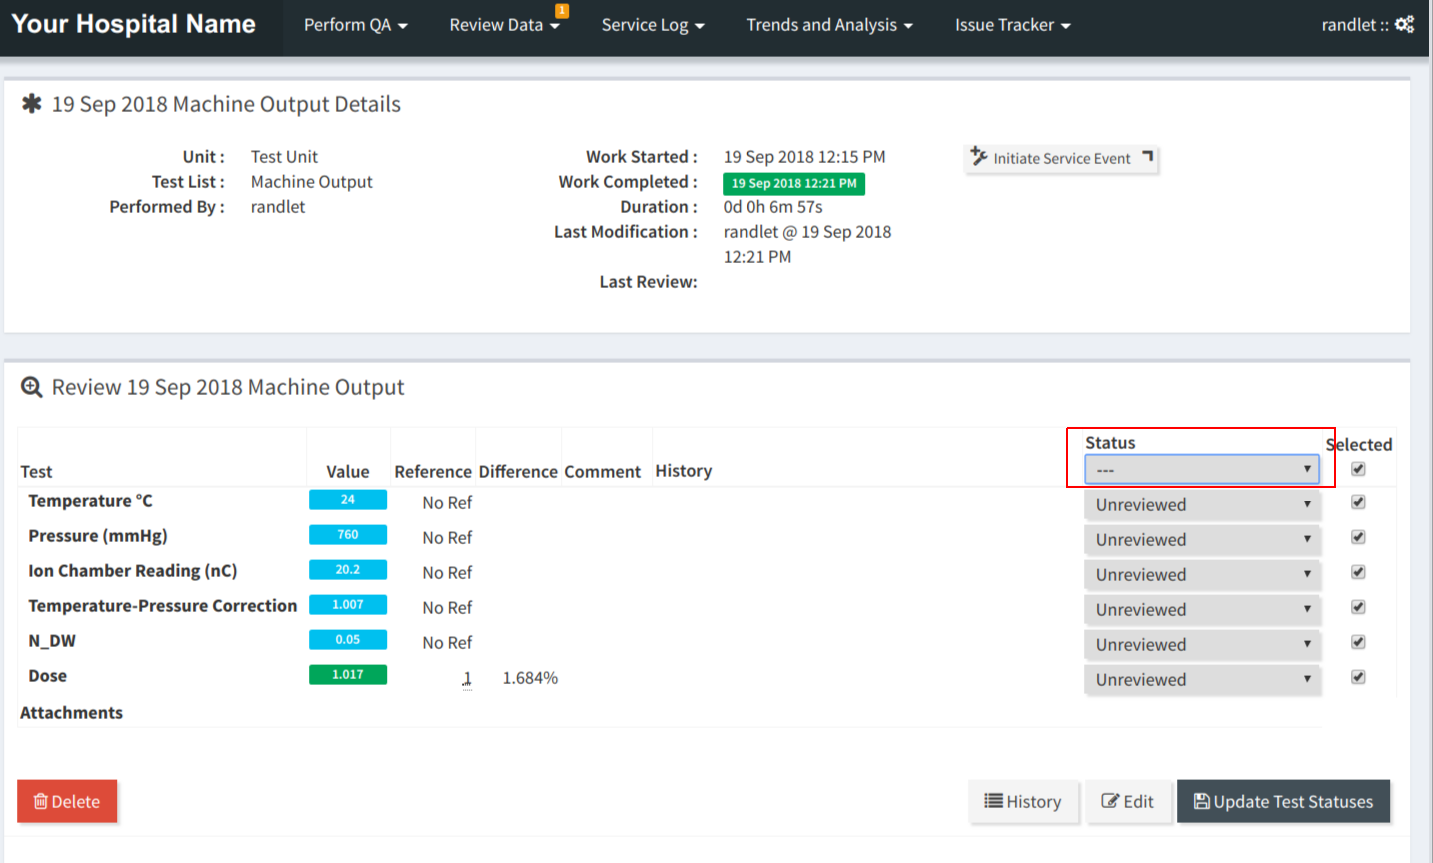
Reviewing a test list
That Test List instance will now be removed from the Unreviewed queue. Note that it is also possible to automate review and approval.
Wrapping Up
We have now gone through the basics of taking QATrack+ from a blank installation all the way to performing and reviewing our first Test List! Check out the admin guide (for configuration) and users guide (for end user instructions) for more information.