Upgrading an existing Windows v0.3.0 installation to v3.1.1.4
This guide will walk you through upgrading your existing v0.3.0 installation to v3.1.1. If you currently have a 0.2.x version of QATrack+, you first need to follow the instructions to upgrade to 0.3.0, before carrying out these instructions.
These instructions assume you are using Windows Server 2016-2019 and SQL Server 2016-2019. No testing is done on earlier versions of Windows or SQL Server and it is recommended that if you are running on Windows Server < 2016 you migrate your QATrack+ installation to a more recent database/OS version when you upgrade QATrack+.
Prerequisites
Take a snapshot
If your QATrack+ server exists on a virtual machine, now would be a great time to take a snapshot of your VM in case you need to restore it later! Consult with your IT department on how to do this.
Ensure ODBC Driver 17 (or 13.1) is installed
In order for QATrack+ to connect to your database, you need to have the ODBC Driver 17 installed. Visit https://www.microsoft.com/en-us/download/details.aspx?id=56567 and download and install the driver (64 bit).
Install Google Chrome
If you want to be able to generate or schedule PDF reports, you need to have Google Chrome installed. Download and install Chrome here: https://www.google.com/chrome/index.html
Stop your CherryPy Service to Serve QATrack+
If you have an existing CherryPy service running for QATrack+, open the windows services dialog, find the QATrack3CherryPyService, right click on it and select Stop. Then right click on it again, select Properties and set the Startup type to disbled before clicking OK.
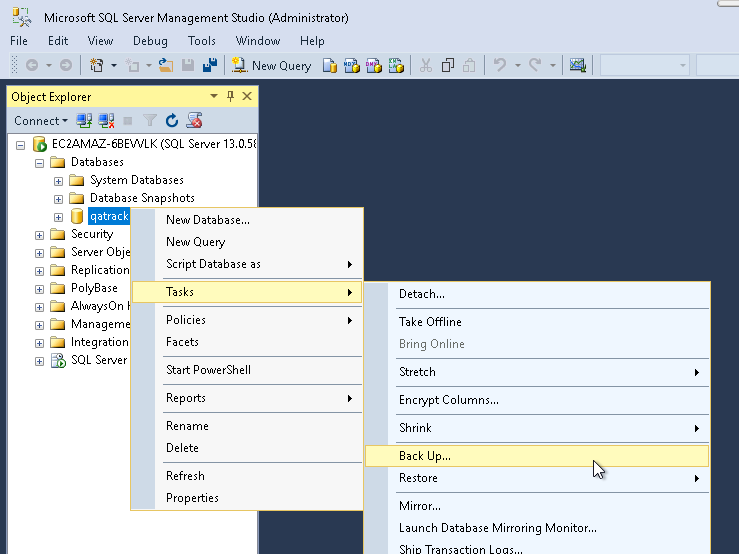
Backing up your database
It is extremely important you back up your database before attempting to upgrade. In order to generate a backup open SQL Server Management Studio (SSMS), right click on your database then select Tasks -> Back Up..
Backup Menu Item
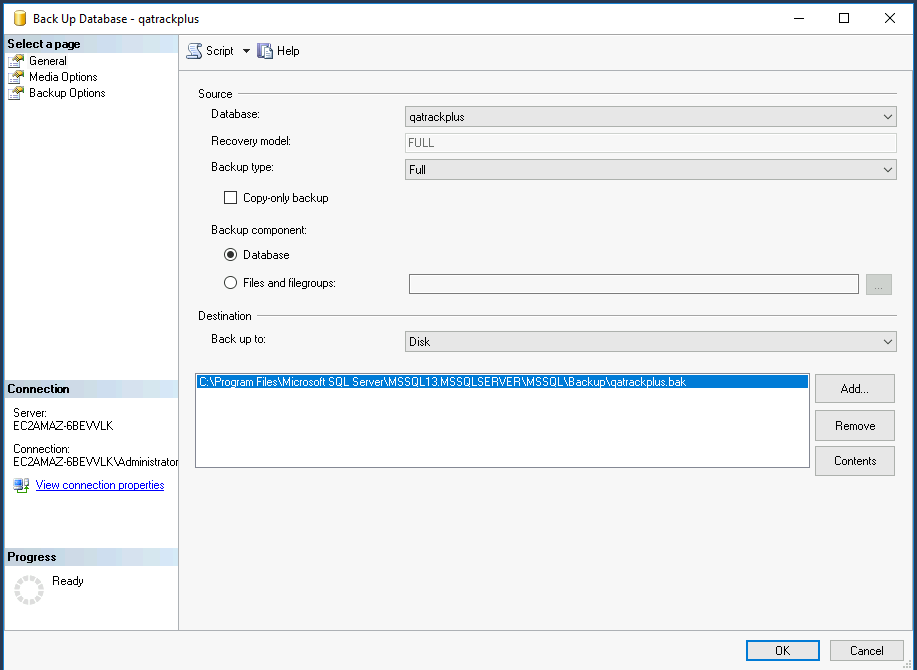
Select Copy-only backup and make sure the Backup component is set to Database. Take note of where the backup is being stored and then click OK:
Backup Dialog
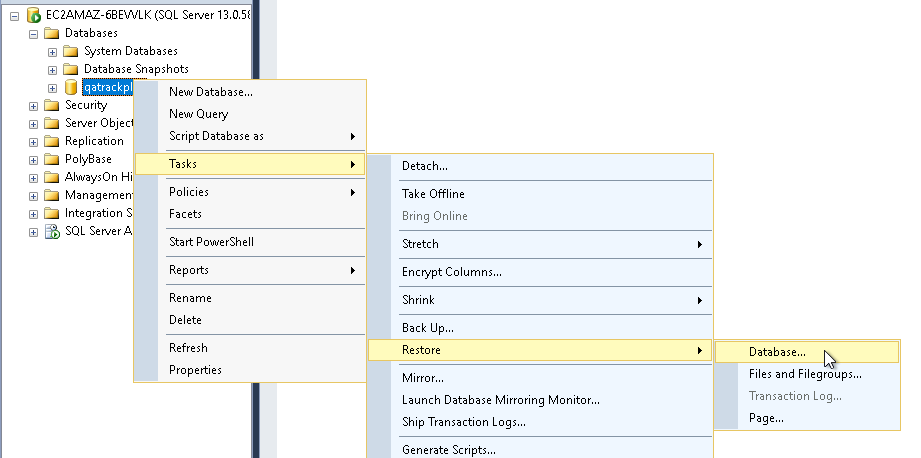
Copy your database
In order to make reverting to your prior configuration simpler, it is recommended to clone your existing database then perform the upgrade on it instead.
In the Object Explorer panel, right click on your database and select Tasks->Restore Database
Restore database menu
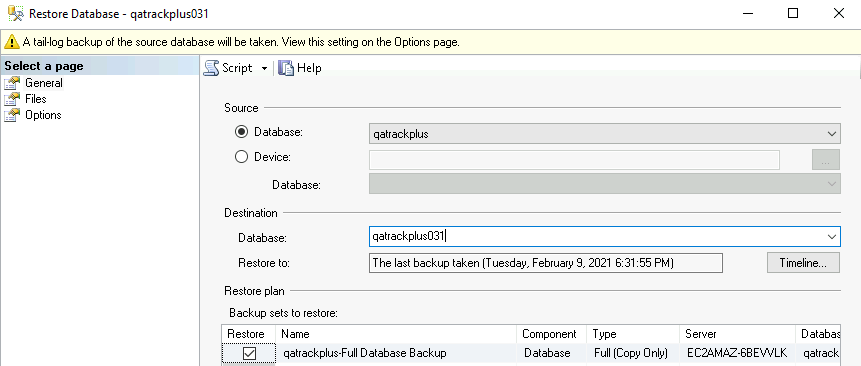
In the Source section leave your existing database as the source in the Database section selected.
In the Destination section edit the Database field to qatrackplus31. This will ensure you are not overwriting your old database.
Set database destination
Next select the Files page from the left hand sidebar and select the Relocate all files to folder option:
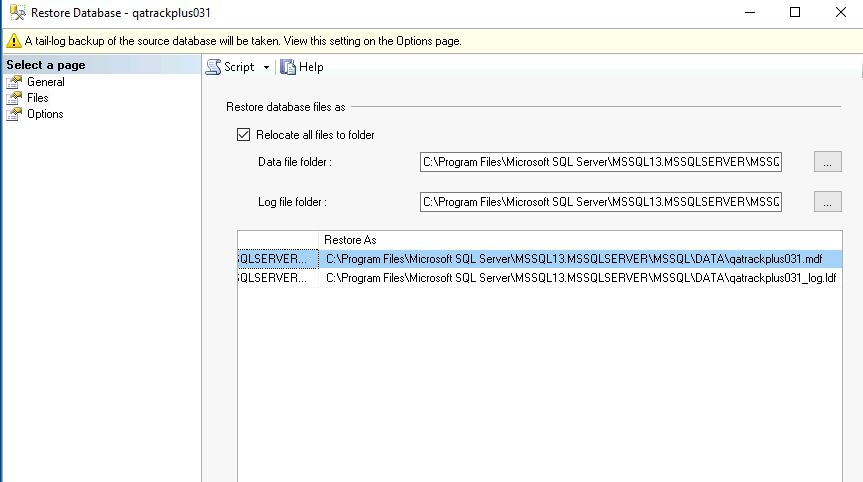
relocate data files
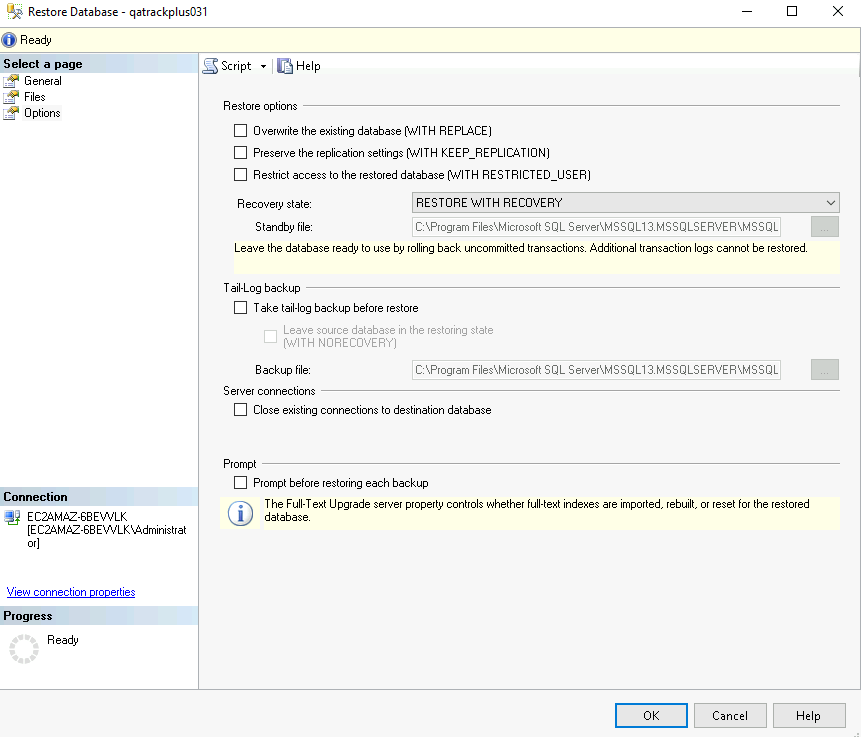
Lastly select the Options page from the left hand sidebar and deselect the Take tail-log backup before restore.
Disable tail log
Then click OK. Be patient while the database restores.
Add A Readonly User to Your New Database
Your existing QATrack+ database user should still be present on your new database, however, you should ensure they have the correct rights. In the Object Explorer from expand the qatrackplus31 database, then expand the Security and Users folders, then right click on the qatrack user and select Properties. Under the Database Role Membership region select db_ddladmin, db_datawriter, db_datareader and db_owner. Click OK.
We also need to add a readonly database for this version of QATrack+. In the Object Explorer frame, right click on the main Security folder and click New Login… Set the login name to ‘qatrack_reports’, select SQL Server Authentication. Enter ‘qatrackpass’ (or whatever you like) for the password fields and uncheck Enforce Password Policy. Click OK.
Back in the Object Explorer frame, expand the qatrackplus31 database, right click on Security and select New->User.
Enter ‘qatrack_reports’ as the User name and Login name and then in the Database Role Membership page select ‘db_datareader’. Click OK.
Check your Python version
Version 3.1.1, runs best on Python 3.7, 3.8, & 3.9 (3.6 works ok but installing dependencies is more complicated). Check your version of Python 3 by opening a PowerShell prompt and entering:
python -V
if that shows a version of Python lower than 3.7 then you will need to install a more up to date version of Python before proceeding (see https://python.org). You will need to re-open your PowerShell Window after installing Pyton.
Checking out version 3.1.1
First we must check out the code for version 3.1.1 in a PowerShell window:
cd C:\deploy\qatrackplus
git remote set-url origin https://github.com/qatrackplus/qatrackplus.git
git fetch origin
git checkout v3.1.1.4
Setting up our Python environment (including virtualenv)
We will create a new Virtual Environment in order to make it simpler to revert to your old environment if required. To create the virtual environment run the following commands:
python -m venv C:\deploy\venvs\qatrack31
Anytime you open a new terminal/shell to work with your QATrack+ installation you will want to activate your virtual environment. Do so now like this:
cd C:\deploy
.\venvs\qatrack31\Scripts\Activate.ps1
Your command prompt should now be prefixed with (qatrack31).
It’s also a good idea to upgrade pip the Python package installer:
pip install --upgrade pip
We will now install all the libraries required for QATrack+ (be patient, this can take a few minutes!):
cd C:\deploy\qatrackplus
pip install -r requirements\win.txt
Warning
If you are going to be using Active Directory for authenticating your users, you need to install pyldap. There are binaries available on this page: https://www.lfd.uci.edu/~gohlke/pythonlibs/#python-ldap. Download the binary relavant to your distribution (e.g. python_ldap‑3.3.1‑cp39‑cp39‑win_amd64.whl) and then pip install it:
pip install C:\path\to\python_ldap‑3.3.1‑cp39‑cp39‑win_amd64.whl
Configuration of QATrack+
Next we need to tell QATrack+ how to connect to our newly restored database.
Edit your qatrack\local_settings.py and adjust your DATABASE setting so it looks similar to this:
DATABASES = {
    'default': {
        'ENGINE': 'sql_server.pyodbc',
        'NAME': 'qatrackplus31',
        'USER': 'qatrack',
        'PASSWORD': 'qatrackpass',
        'HOST': '',  # leave blank unless using remote server or SQLExpress (use 127.0.0.1\\SQLExpress or COMPUTERNAME\\SQLExpress)
        'PORT': '',  # Set to empty string for default. Not used with sqlite3.
        'OPTIONS': {
            'driver': 'ODBC Driver 17 for SQL Server'
        },
    },
    'readonly': {
        'ENGINE': 'sql_server.pyodbc',
        'NAME': 'qatrackplus31',
        'USER': 'qatrack_reports',
        'PASSWORD': 'qatrackpass',
        'HOST': '',  # leave blank unless using remote server or SQLExpress (use 127.0.0.1\\SQLExpress or COMPUTERNAME\\SQLExpress)
        'PORT': '',  # Set to empty string for default. Not used with sqlite3.
        'OPTIONS': {
            'driver': 'ODBC Driver 17 for SQL Server'
        },
    }
}
Once you have got those settings done, we can now test our database connection:
python manage.py showmigrations accounts
which should show output like:
accounts
    [ ] 0001_initial
    [ ] 0002_activedirectorygroupmap_defaultgroup
    [ ] 0003_auto_20210207_1027
If you were able to connect to your database, we can now migrate the tables in our database.
python manage.py migrate
You also need to create a cachetable in the database:
python manage.py createcachetable
and finally we need to collect all our static media files in one location for Apache to serve:
python manage.py collectstatic
Update your CherryPy Service to Serve QATrack+
Open a new PowerShell window with Administrator privileges (right click on PowerShell and click “Run as Administrator”) and run the following commands:
cd C:\deploy
.\venvs\qatrack31\Scripts\Activate.ps1
cd qatrackplus
python C:\deploy\venvs\qatrack31\Scripts\pywin32_postinstall.py -install
cp deploy\win\QATrack31CherryPyService.py .
python QATrack31CherryPyService.py --startup=auto install
python QATrack31CherryPyService.py start
Open the Windows Services dialog and confirm the QATrack 31 CherryPy Service is installed and has a status of Running.
Your QATrack+ 3.1.1 installation is now installed as a Windows Service running on port 8080 (see note below). You may also wish to configure the service to email you in the event of a crash (see the Recovery tab of the QATrackCherryPyService configuration dialogue).
Note
If you need to run QATrack+ on a different port, edit C:\deploy\qatrackplus\QATrack3CherryPyService.py and set the PORT variable to a different port (e.g. 8008)
Setting up Django Q
As of version 3.1.0, some features in QATrack+ rely on a separate long running process which looks after periodic and background tasks like sending out scheduled notices and reports. We are going to use Windows Task Scheduler to run the Django Q task processing cluster.
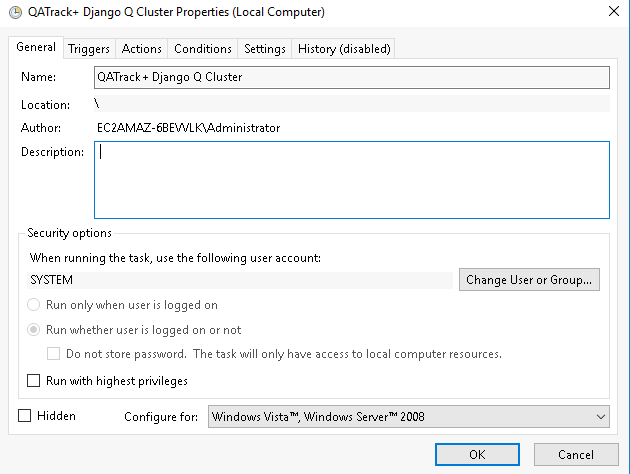
Open the Windows Task Scheduler application and click Create Task. Give the task a name of “QATrack+ Django Q Cluster”. Click the Change User or Group… button and in the Enter the object name to select box put SYSTEM, then click Check Names and OK.
QCluster Task
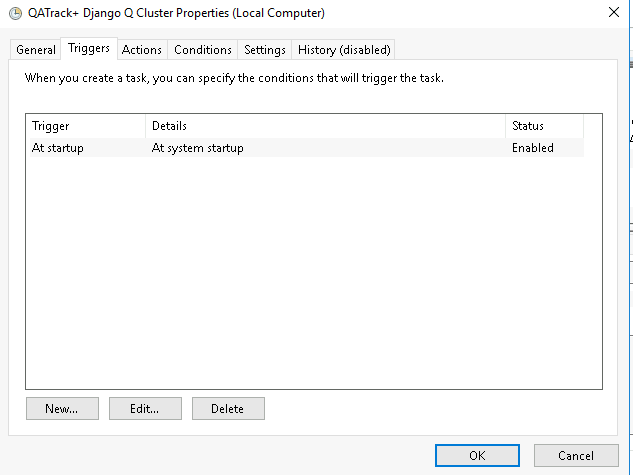
On the Triggers tab, click New… and in the Begin the task: dropdown select At startup and then click OK.
QCluster Trigger
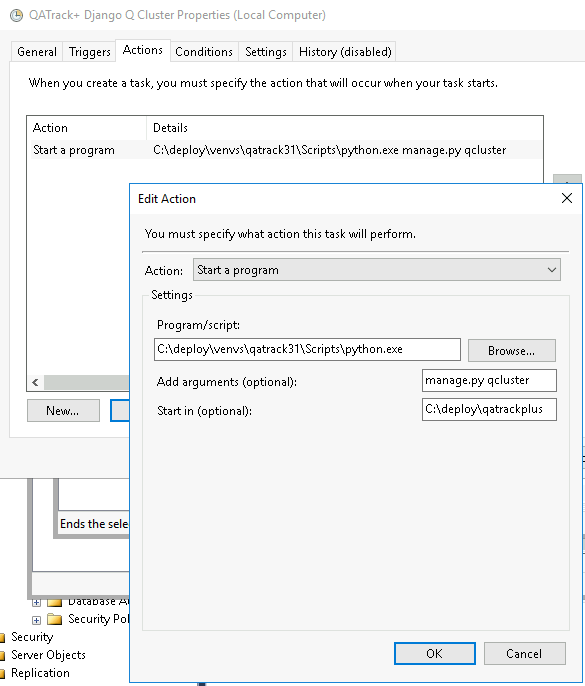
Now go to the Actions tab and click New…. In the Program/script: box enter C:\deploy\venvs\qatrack31\Scripts\python.exe. In the Add arguments (optional): field enter manage.py qcluster, and in the Start in (optional): field put C:\deploy\qatrackplus (no trailing slash!).
QCluster Action
Click OK, then right click on the task and select Run. Go back to your PowerShell window (or open a new one) and confirm your task cluster is running with python manage.py qmonitor which should show something like:
 Host            Id      State    Pool    TQ       RQ       RC    Up

YOUR-SERVER    e0474f3f  Idle     2       0        0        0     0:05:53

     ORM default     Queued    0    Success   48   Failures       0

                     [Press q to quit]
If the line between Host and ORM default is blank then there is a problem with the Windows Task you created.
What Next
Make sure you have read the release notes for version 3.1.0 carefully. There are some new settings you may want to adjust.
Since the numpy, scipy, pylinac, pydicom, & matplotlib libraries have been updated, some of your calculation procedures may need to be adjusted to restore functionality.
Adjust your backup script so that it is now backing up the qatrackplus31 database instead of the version 0.3.0 database!
Last Word
There are a lot of steps getting everything set up so don’t be discouraged if everything doesn’t go completely smoothly! If you run into trouble, please get in touch on the mailing list.