Upgrading an existing Windows v0.2.X installation to v3.1.1.4
This document will walk you through migrating an existing v0.2.X version of QATrack+ to a new Windows server. Although it may be possible, upgrading a QATrack+ 0.2.x installation in place is not recommended. This guide assumes you are moving to a new server. If you need advice please get in touch on the mailing list.
On your old server
The first step to migrating your existing QATrack+ installation is to generate the backup files to move everything to your new server.
Backup your QATrack+ install data
Note
We will assume you are currently using a database named ‘qatrackplus’ but if not (check the DATABASE settings in qatrack/local_settings.py) replace ‘qatrackplus’ in the instructions below with your database name (e.g. qatrackdb).
In order to generate a backup open SQL Server Management Studio (SSMS), right click on your database then select Tasks -> Back Up..
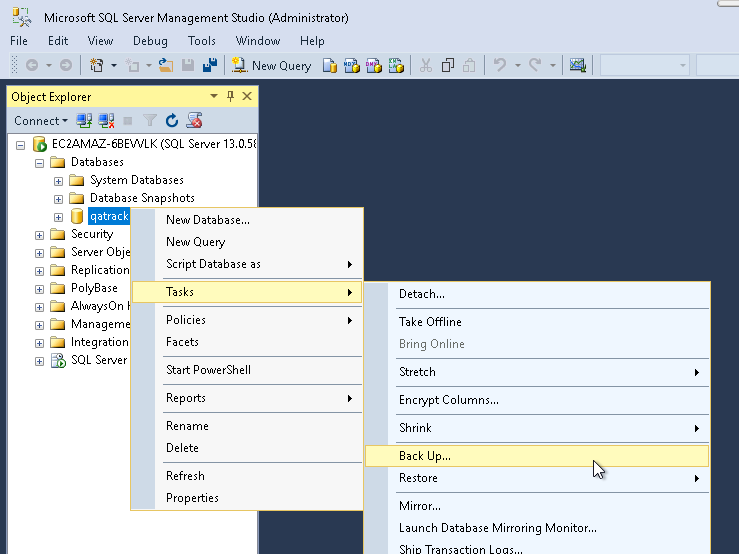
Backup Menu Item
Select Copy-only backup and make sure the Backup component is set to Database. Take note of where the backup is being stored and then click OK:
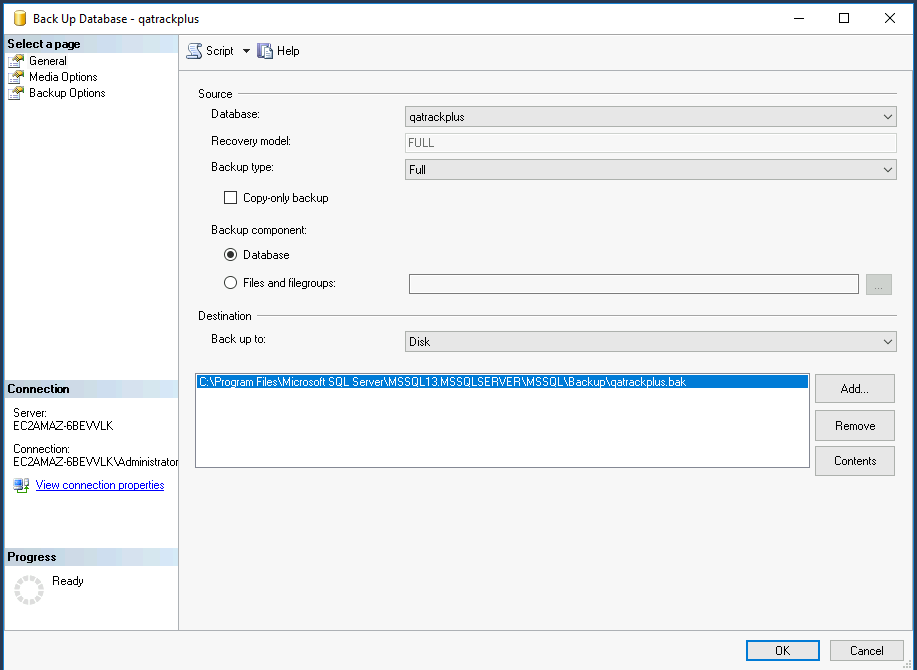
Backup Dialog
and create a zip archive of your uploads directory:
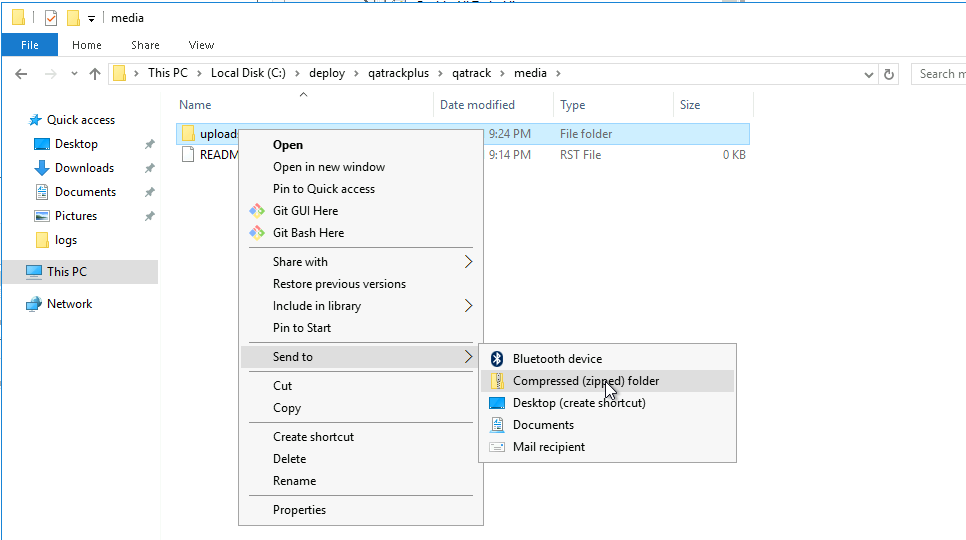
Create zip archive of uploads
On your new server
Copy the qatrackplus.bak and uploads.zip to your new server, these will be needed below. The qatrackplus.bak file should go in your SQL Server backup directory which is located at e.g. C:\Program Files\Microsoft SQL Server\MSSQL13.MSSQLSERVER\MSSQL\Backup (the MSSQL13.MSSQLSERVER might have a different version number in it depending on what version of SQL Server you are using).
Install Python 2.7 (Only required for QATrack+ 0.2.8 and below. Not required for 0.2.9)
Visit https://www.python.org/downloads/windows/ and download the latest (64 bit) Python 2.7 release. Select Install for all users but do not add python.exe to Path when given the option.
Installing Python 3 (required for all)
Go to http://www.python.org/downloads/ and download the latest Python 3.9.X (3.9.1 at the time of writing) 64 bit version (e.g. the “Windows installer (64-bit)” link). Run the installer and on the first page, make sure both “Install launcher for all users” and “Add Python 3.9 to PATH” are checked and then click the “Customize Installation” button.
On the second page of the installer, leave the defaults and click “Next”.
On the third page, make sure you have “Install for all users” selected (this is important!) before clicking “Install”.
Ensure SQL Server Authentication is enabled
Open SQL Server Management Studio and connect to ‘localhost’ or another database server.
In the Object Explorer frame right click on the server you are connected to and click Properties. In the dialog that opens click on Security, ensure SQL Server and Windows Authentication mode is selected and then click OK. Now right click on your server again and click Restart.
Restoring your previous database
We can now restore your previous database. On your new server, open SQL Server Management Studio (SSMS) and in the Object Explorer panel, right click the Databases item and select Restore Database…
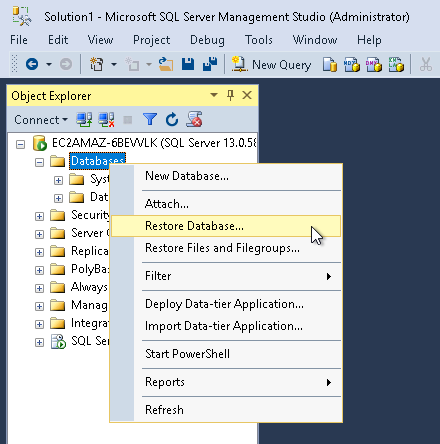
Restore database menu
In the General page, select Device and then click the … button, and then the Add button. Navigate to whereever you copied the SQL Server .bak file from your old server, select it and click OK and then OK again.
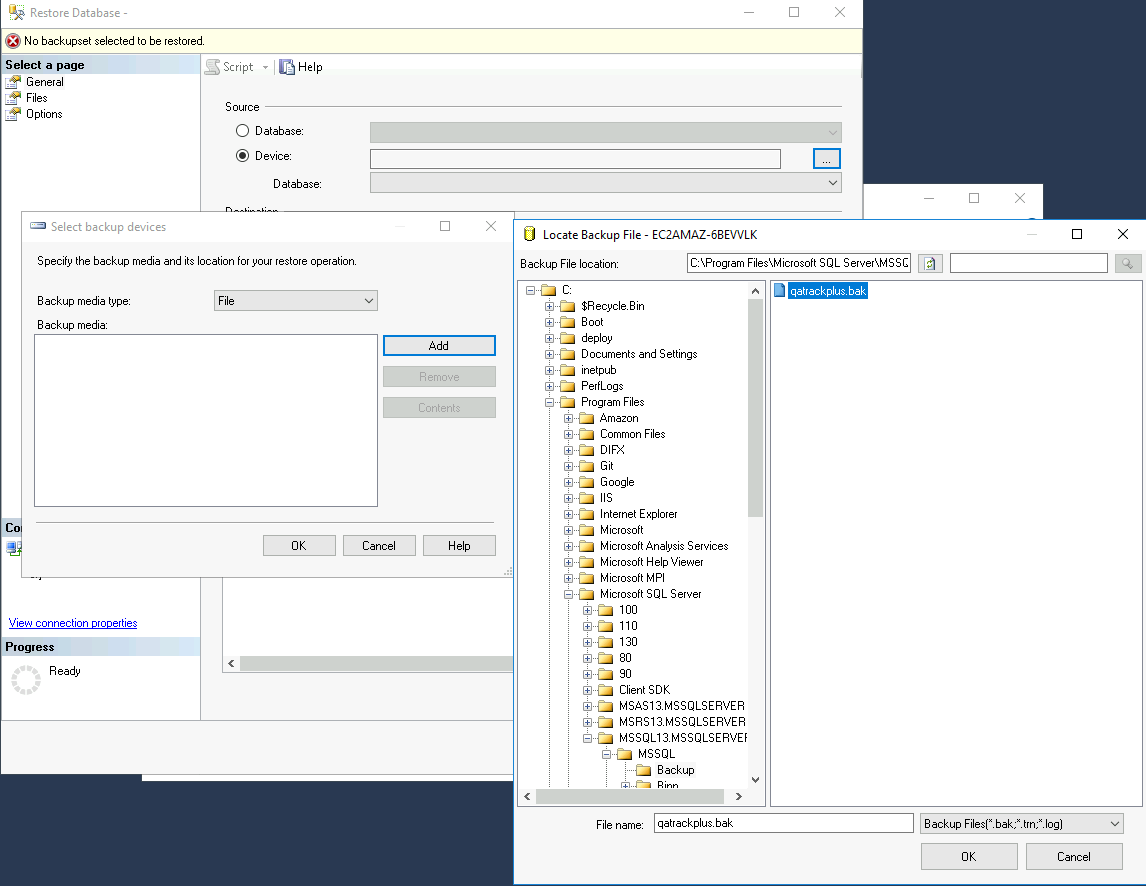
Selecting the database restore file
Assuming you don’t already have a database called qatrackplus on this server, set the Destination database to qatrackplus and then click OK.
Back in the Object Explorer frame, right click on the main Server Security folder and click New Login… Set the login name to ‘qatrack’, select SQL Server Authentication. Enter ‘qatrackpass’ (or whatever you like) for the password fields and uncheck Enforce Password Policy. Click OK.
Back in the Object Explorer frame, expand the qatrackplus31 database, right click on Security and select New->User.
Enter ‘qatrack’ as the User name and Login name and then in the Database Role Membership region select ‘db_ddladmin’, ‘db_datawriter’, ‘db_datareader’ and ‘db_owner’. Click OK.
Assuming your database restoration was successful, you may now proceed with upgrading the database to v0.3.0.
Installing git and checking out the QATrack+ Source Code
Go to http://git-scm.com and download the latest version of git (msysgit) for Windows (Git-2.30.0 at the time of writing). Run the installer. I just leave all the settings on the defaults but you are free to modify them if you like.
Checkout the latest release of QATrack+ source code from GitHub
Open a Windows PowerShell terminal and then create a directory for QATrack+ and check out the source code, use the following commands:
mkdir C:\deploy
cd C:\deploy
git clone https://github.com/qatrackplus/qatrackplus.git
Restore your upload files
Assuming you are on a new server and have an uploads file that you want to restore you should do so now.
Open an Explorer window and navigate to where ever you copied your uploads.zip file to. Right click on it and select Extract All…. In the window that opens, set the destination for the files to C:\deploy\qatrackplus\qatrack\media and then click OK:
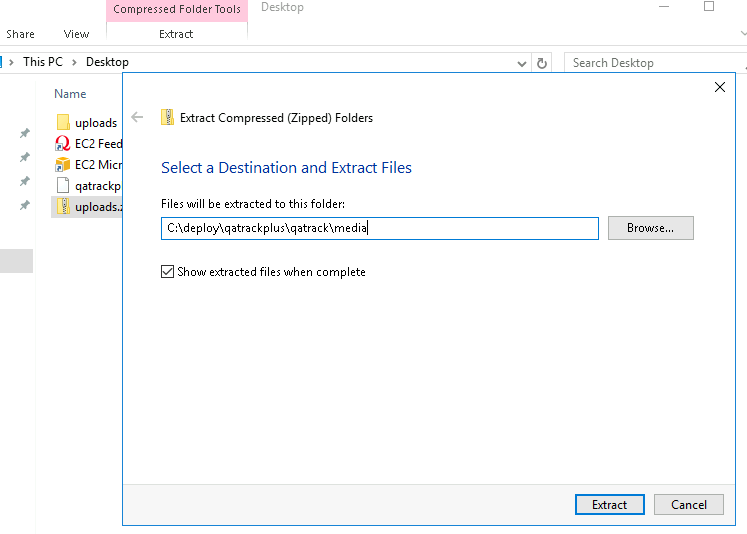
Extracting your uploads file
Setting up our Python environment (including virtualenv)
If you have a v0.2.9 database, you will only need a Python 3 installation, however if you have an older QATrack+ installation, you will also require Python 2.7. If you have a v0.2.9 database, you can skip this next section.
Migrating 0.2.X (where X < 9) to v0.2.9
Use your favourite text editor to create a local_settings.py file with the following contents:
DATABASES = {
    'default': {
        'ENGINE': 'sqlserver_ado',  # use this for upgrading to 0.2.9
        'NAME': 'qatrackplus',
        'USER': 'qatrack',
        'PASSWORD': 'qatrackpass',
        'HOST': '',  # leave blank unless using remote server or SQLExpress (use 127.0.0.1\\SQLExpress or COMPUTERNAME\\SQLExpress)
        'PORT': '',  # Set to empty string for default. Not used with sqlite3.
        'OPTIONS': {
            'provider': 'SQLOLEDB'
        },
    },
}
Open a new PowerShell Window and create and activate a new Python 2 environment:
cd C:\deploy
mkdir venvs
C:\Python27\python.exe -m pip install --upgrade pip
C:\Python27\python.exe -m pip install virtualenv
C:\Python27\Scripts\virtualenv.exe venvs\qatrack2
.\venvs\qatrack2\Scripts\Activate.ps1
Now checkout v0.2.9 and install the required Python packages:
cd C:\deploy\qatrackplus
git checkout v0.2.9.2
pip install -r requirements\base.txt
pip install -r requirements\win.txt
Now migrate your database to v0.2.9
python manage.py syncdb
python manage.py migrate
and deactivate the virtualenv
deactivate
Migrating 0.2.9 to 0.3.0
Check out QATrack+ version 0.3.0
In order to upgrade our 0.2.9 installation to 0.3.0, first we need to checkout the QATrack+ v0.3.0 source code:
cd ~/web/qatrackplus
git checkout v0.3.0.20
Now use your favourite text editor to create a local_settings.py file (or edit your existing one if you created one for updating to 0.2.9) with the following contents:
DATABASES = {
    'default': {
        'ENGINE': 'sql_server.pyodbc', # use this for upgrading 0.2.9 to 0.3.0
        'NAME': 'qatrackplus',
        'USER': 'qatrack',
        'PASSWORD': 'qatrackpass',
        'HOST': '',  # leave blank unless using remote server or SQLExpress (use 127.0.0.1\\SQLExpress or COMPUTERNAME\\SQLExpress)
        'PORT': '',  # Set to empty string for default. Not used with sqlite3.
        'OPTIONS': {
            'driver': 'ODBC Driver 17 for SQL Server'
        },
    },
}
Creating our virtual environment
Ensure you have python3 installed correctly and on your PATH by running:
python --version
# should print e.g. Python 3.9.1 or similar
Create and activate a new Python 3 virtual environment:
cd C:\deploy
mkdir venvs  # only if you haven't already created it
python -m venv venvs\qatrack3
.\venvs\qatrack3\Scripts\Activate.ps1
pip install --upgrade pip
We will now install all the libraries required for QATrack+:
cd C:\deploy\qatrackplus
pip install -r requirements\win.txt
Migrating the 0.2.9 database to 0.3.0
We are now ready to migrate our 0.2.9 database to v0.3.0:
python manage.py migrate --fake-initial
Setting up IIS
Open up the Internet Information Services (IIS) application. We are going to use IIS for two purposes: first, it is going to serve all of our static media (css, js and images) and second it is going to act as a reverse proxy to forward the QATrack+ specific requests to CherryPy.
Before starting please make sure you have both URL Rewrite 2.1 and Application Request Routing 3.0 IIS modules installed. These can be installed by clicking on the “Get New Web Platform Components” link in the right hand side bar of IIS (you may need to install the Web Platform Installer first).
After installing these modules, you will need to close & re-open IIS.
Enabling Proxy in Application Request Routing
Application Request Routing needs to have the proxy setting enabled. To do this, click on the top level server in the left side panel, and then double click the Application Request Routing icon. In the Actions panel click the Server Proxy Settings and then check Enable proxy at the top. Leave all the other settings the same and click Apply and then Back to ARR Cache.
Enabling Static Content Serving in IIS
IIS is not always set up to serve static content. To enable this, open the Server Manager software, click Manage, then Add Roles and Features then Next, Next. In the Roles widget, select Web Server(IIS)->Web Server->Common HTTP Features and make sure Static Content is selected. If it isn’t, enable that role.
Setting up the site and URL rewrite rules
Once you have Applicationn Request Routing installed and proxies enabled, in the left panel of IIS under Sites, select the default Web Site and click Stop on the right hand side.
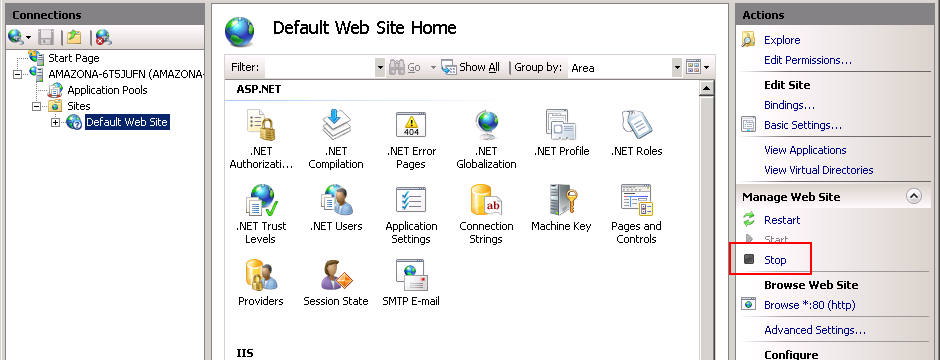
Stop default website
Now right click on Sites and click Add Web Site
Add a new web site
Enter QATrack Static for the Site Name and “C:\deploy\qatrackplus\qatrack\” for the Physical Path then click OK and answer Yes to the warning.
To test that setup worked correctly open a browser on your server and enter the address http://localhost/static/qa/img/tux.png You should see a picture of the Linux penguin.
Next, select the top level server in the Connections pane and then double click URL Rewrite:
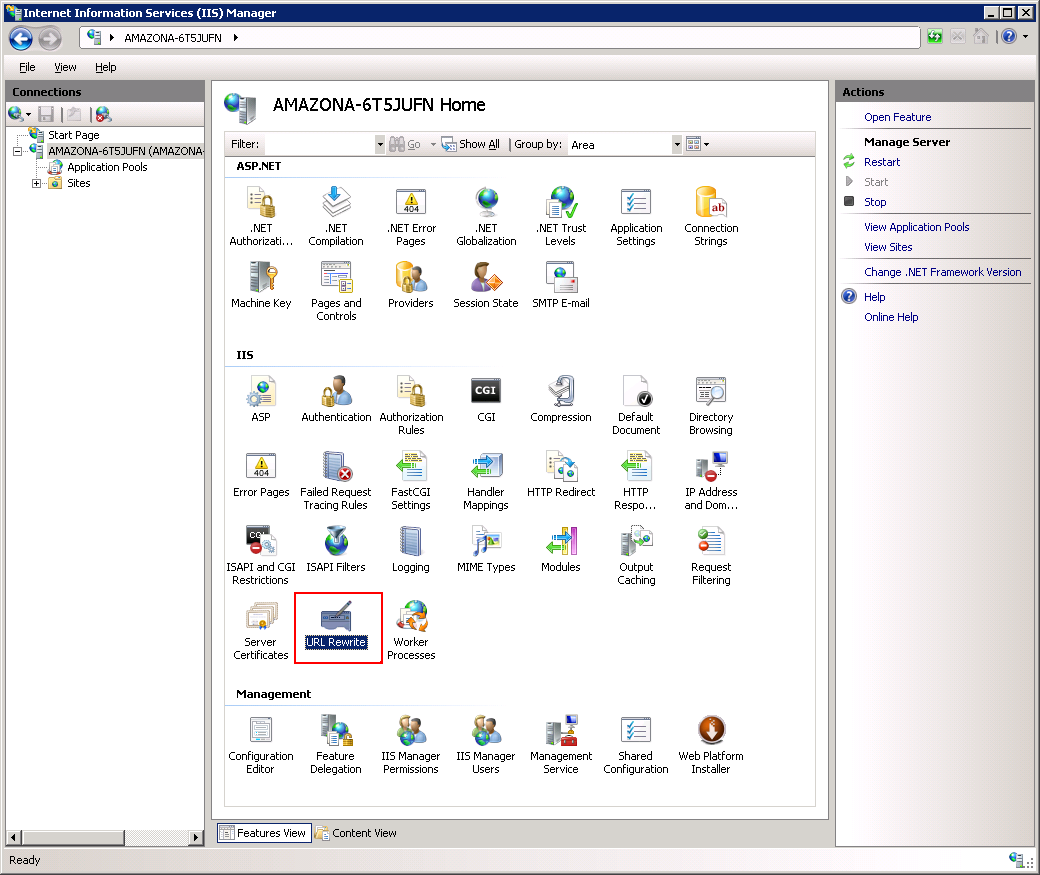
URL Rewrite
In the top right click Add Rule and select Blank Rule.
Give it a name of QATrack Static and enter ^(static|media)/.* for the Pattern field, and select None for the Action type. Make sure Stop processing of subsequent rules is checked.
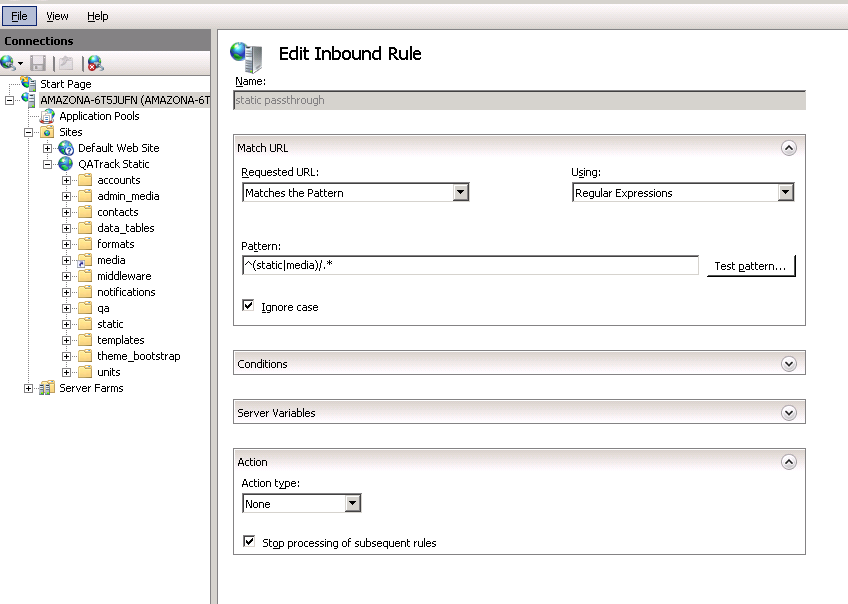
Static URL Rewrite Rule
When finished click Apply, then Back To Rules and then add another blank rule. Give it a name of QATrack Reverse Proxy, enter ^(.*) for the Pattern and http://localhost:8080/{R:1} for the Rewrite URL. In the Server Variables section add a new Server Variable with the Name=HTTP_X_FORWARDED_HOST and the Value=yourservername.com (replace yourservername with whatever your domain is!). Finally, make sure both Append query string and Stop processing of subsequent rules are checked.
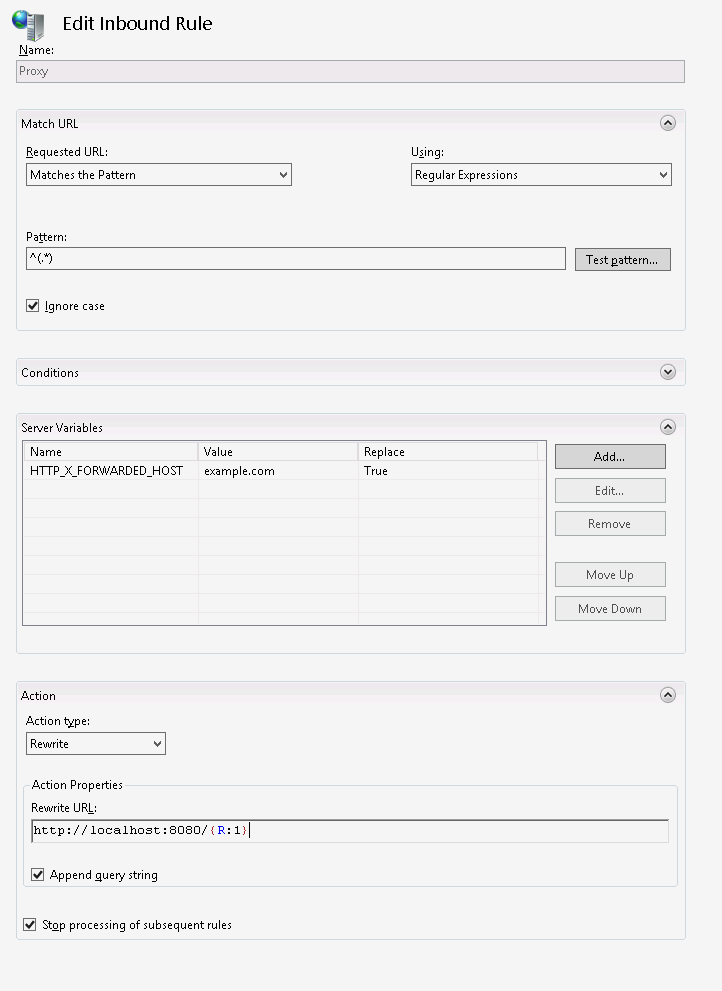
URL Rewrite Reverse Proxy
Your URL rewrites should look like the following (order is important!)

URL Rewrite rules
Next Steps
Now that you have upgraded to 0.3.0, you should proceed directly to upgrading to v3.1.1 from v0.3.0;