Image Analysis Using pylinac and the QATrack+ API
As of version 0.3.0, QATrack+ includes pylinac which for image and log file analysis. This tutorial will cover setting up a Picket Fence imaging test and then performing the test both via the web interface and the QATrack+ API.
Setting up the Test List
Log into QATrack+ and navigate to the admin section. Create the following tests (if you haven’t created a Test List before, go through the step-by-step test list tutorial before attempting this tutorial):
- Name:
Picket Fence upload & analysis
- Macro name:
pf_upload_analysis
- Category:
Choose existing Category or create an Image Analysis category.
- Type:
File Upload
- Display image:
Ensure this field is checked off
Calculation procedure:
import io
import pylinac

# run the picket fence analysis using pylinac
# note the use of `BIN_FILE` rather than `FILE` since we are dealing with an image
pf = pylinac.PicketFence(BIN_FILE.path)
pf.analyze()

# our dictionary of results to return
pf_upload_analysis = {
    'percent passing': pf.percent_passing,
    'max error': pf.max_error,
    'number of pickets': pf.num_pickets,
    'orientation': pf.orientation,

}

# create a pylinac PDF and create an attachment with it
data = io.BytesIO()
pf.publish_pdf(data)
UTILS.write_file('testingpfpdf.pdf', data)

# convert the image to a png file so it can be displayed when performing the test list
UTILS.write_file('pf-image.png', pf.image)
- Name:
PF orientation (Left-Right, Up-down)
- Macro name:
pf_orientation
- Category:
Choose existing Category
- Type:
String Composite
Calculation procedure:
pf_orientation = pf_upload_analysis['orientation']
- Name:
PF pickets found (#)
- Macro name:
pf_num_pickets
- Category:
Choose existing Category
- Type:
Composite
Calculation procedure:
pf_num_pickets = pf_upload_analysis['number of pickets']
- Name:
PF maximum leaf error (mm)
- Macro name:
pf_maximum_error
- Category:
Choose existing Category
- Type:
Composite
Calculation procedure:
pf_maximum_error = pf_upload_analysis['max error']
- Name:
PF leaves % passing
- Macro name:
pf_leaves_pct_passing
- Category:
Choose existing Category
- Type:
Composite
Calculation procedure:
pf_leaves_pct_passing = pf_upload_analysis['percent passing']
After you have created the Tests, create a Test List called Picket Fence that consists of the 5 Tests we just created:
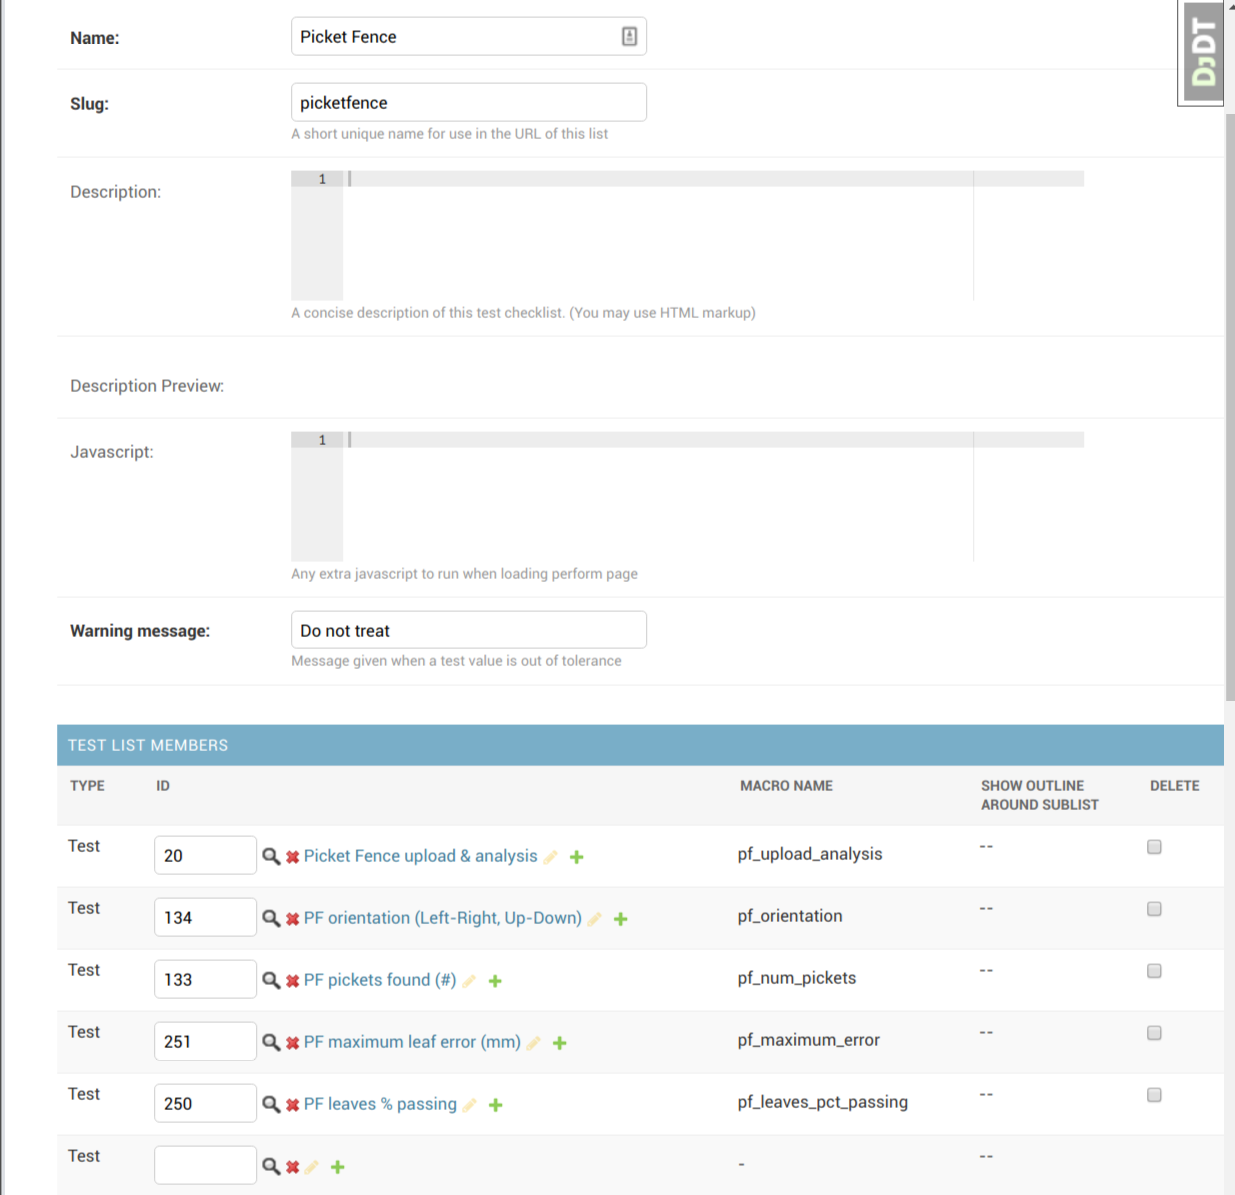
The Picket Fence Test List Definition
Next assign this test list to one or more Units:
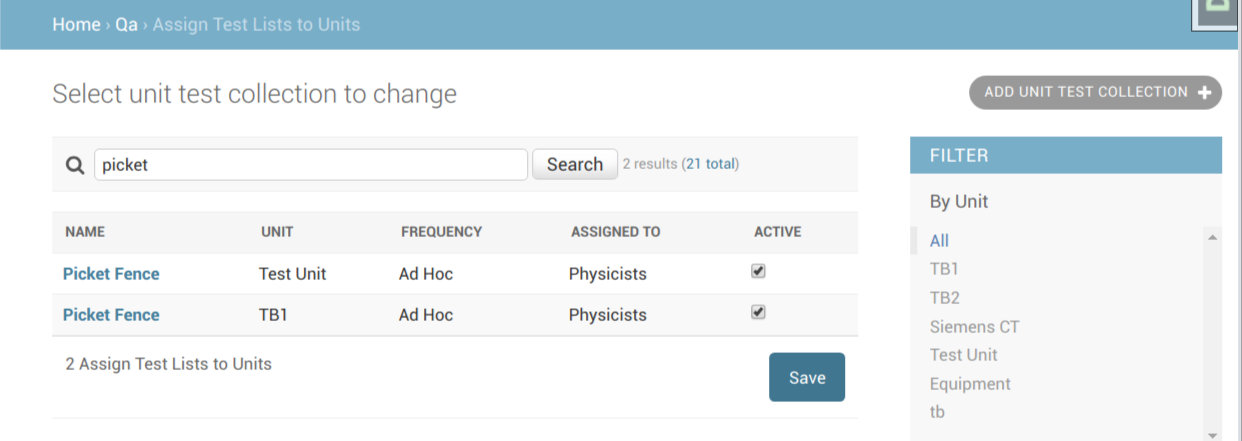
Assigning Picket Fence Test List to Unit
and set References and Tolerances on the Maximum Leaf Error (mm) and PF leaves % passing as shown below:
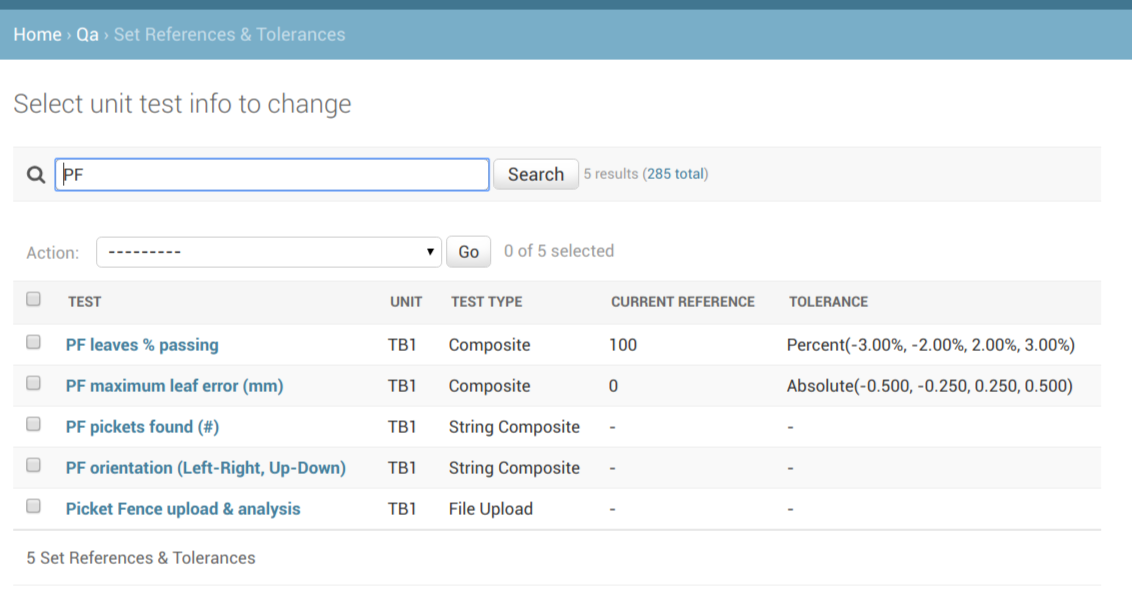
References and Tolerances for Picket Fence test
The Test List is now ready to perform!
Performing the Test List via the web UI
Navigate to the Test List selection for this Unit and click Perform next to the Picket Fence Test List:

Selecting the Picket Fence Test List
on the Test List page, click the Upload button and select your picket fence dicom (or other image format file). After the file is uploaded you will see your other test values automatically populated as well as the image shown:

Test list values after file upload
Click Submit QA Results and you are done!
Performing the Test List via the API
As of version 0.3.0, QATrack+ includes an API which can be used for automating the entry of Test List data. An example of using the API via a Python script is shown here, although the process should be similar in most other programming languages!
Obtain an API token
Before you can access the API, you need to have an API token which can either be created through the Admin section or retrieved programmaticaly:
import requests

root = "http://yourservernamehere/api"
token_url = root + "/get-token/"
resp = requests.post(token_url, {'username': 'user', 'password': 'password'})
token = resp.json()['token']
This token must be included with every request to the API.
Find the Unit Test Collection we want to perform
First we will use the API to retrieve the URL of the Unit Test Collection we want to perform:
import base64
import requests

# the request headers must include the API token
api_token = "YOUR API TOKEN HERE"
headers = {"Authorization": "Token %s" % api_token}

root = "http://yourservernamehere/api"

unit_name = "TB1"
test_list_name = "Picket Fence"
url = root + '/qa/unittestcollections/?unit__name__icontains=%s&test_list__name__icontains=%s' % (unit_name, test_list_name)

# find the UnitTestCollection we want to perform
resp = requests.get(url, headers=headers)
utc_url = resp.json()['results'][0]['url']

# prepare the data to submit to the API. Binary files need to be base64 encoded before posting!
data = {
    'unit_test_collection': utc_url,
    'work_started': "2018-09-19 10:00",
    'work_completed': "2018-09-19 10:30",
    'comment': "Performed via the API!",  # optional
    'tests': {
        'pf_upload_analysis': {  # pf_upload_analysis is the name of our upload test
            'filename': 'picket.dcm', # path to file
            'value': base64.b64encode(open("/home/randlet/Downloads/picket.dcm", 'rb').read()).decode(),
            'encoding': 'base64'
        },
    },
    'attachments': []  # optional
}

# send our data to the server
resp = requests.post(root + "/qa/testlistinstances/", json=data, headers=headers)

if resp.status_code == requests.codes.CREATED: # http code 201
    completed_url = resp.json()['site_url']
    print("Test List performed successfully! View your Test List Instance at %s" % completed_url)
else:
    print("Your request failed with error %s (%s)" (resp.status_code, resp.reason))
Running the script should show:
Test List performed successfully! View your Test List Instance at http://yourservername/qa/session/details/60/
and then viewing that link your browser:
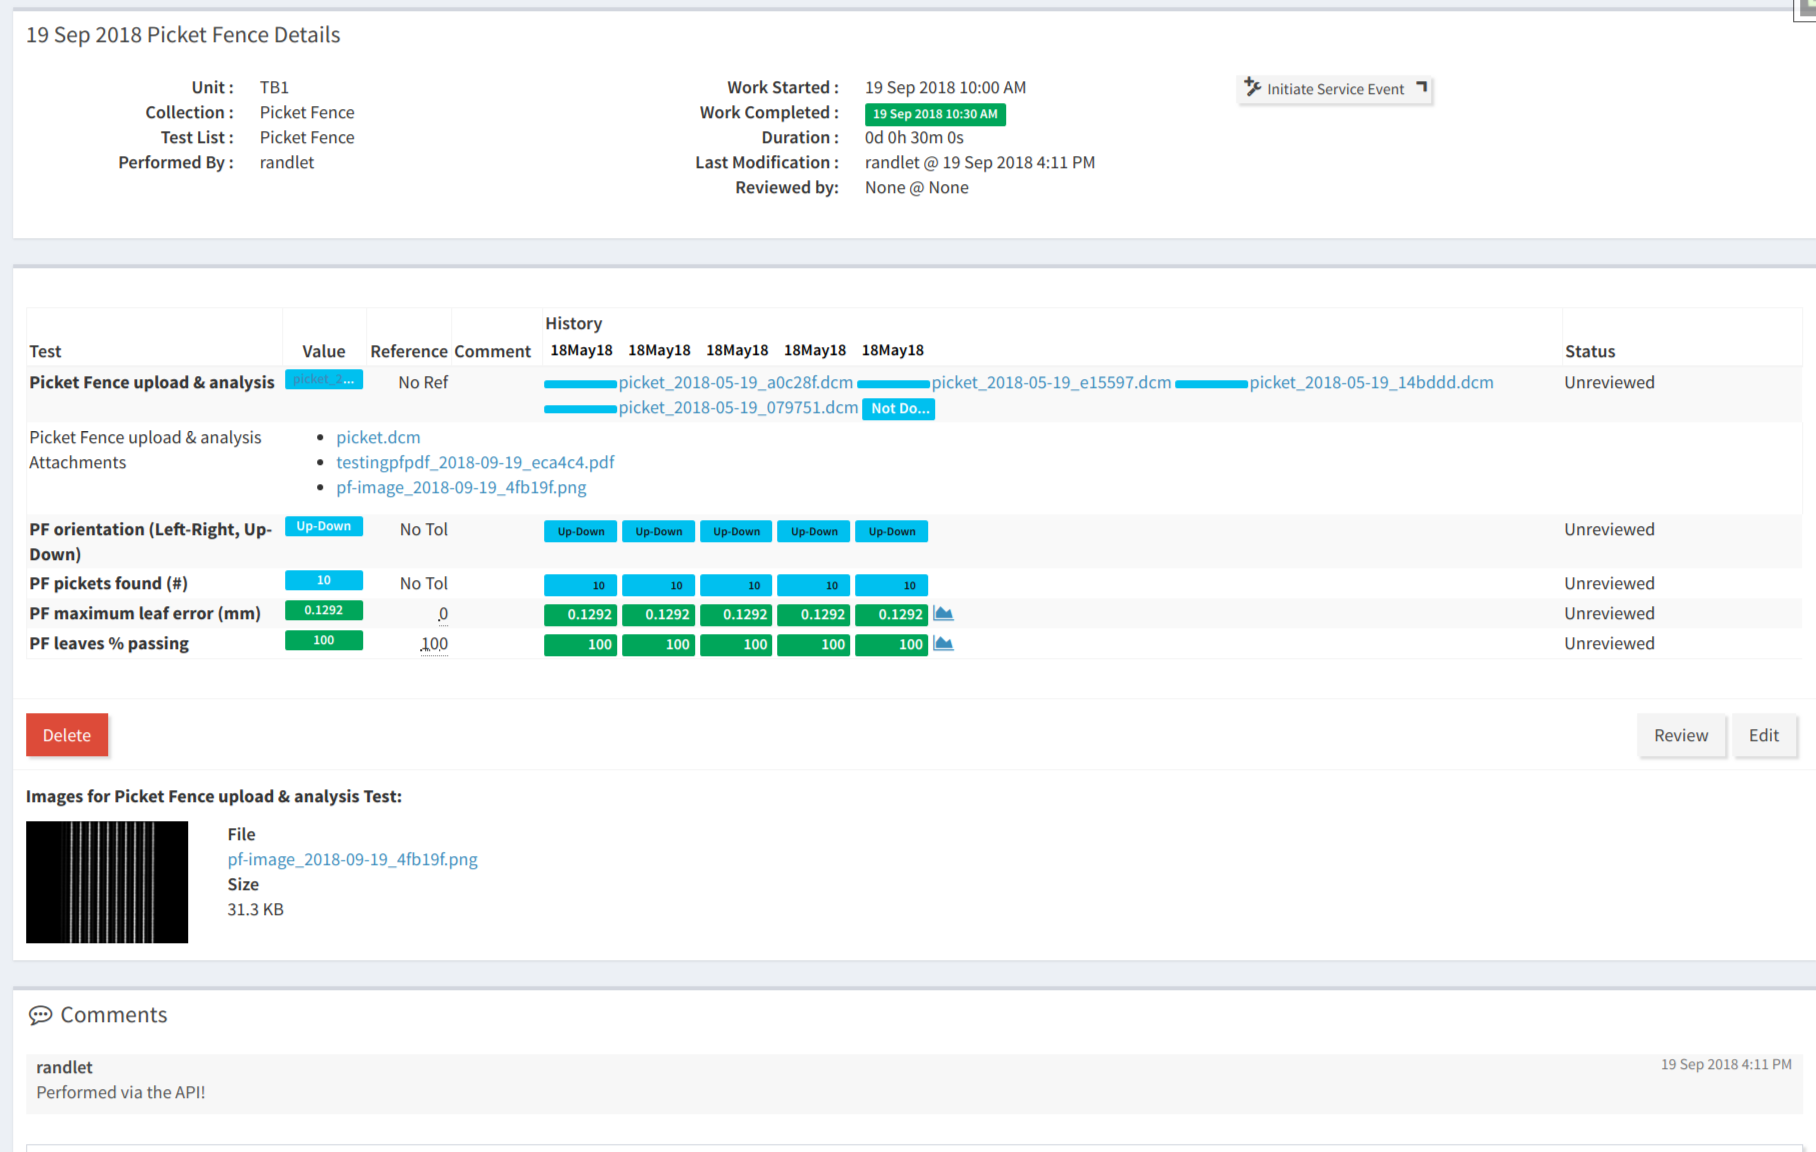
Viewing Test List Details after posting image via API
Acknowledgements
This Test List was originally created with assistance from James Kerns, author of pylinac.